Saturday, October 25, 2014
How to Put WordPress Site Offline

WordPress Visibility option allows you to control who can visit your site, whether search engines will index it or not etc. In my last post, I discussed how to put blogger site offline. And in this post Im gonna talk about WordPress.
In my previous post, I discussed the reasons behind putting a site offline. Here I would like to repeat those reasons -


In my previous post, I discussed the reasons behind putting a site offline. Here I would like to repeat those reasons -
- If your site is new, you can discourage search engines to index your site. Because a new site with insufficient content will not get a good rank.
- If your site is private or subject to premium membership, you can disallow general people to view your contents.
- Due to political violations or religious issues, if your social security is under threat, you can temporarily make your site unavailable instead of deleting it.

Site Visibility Options
- Login to your WordPress site and go to Admin Panel. (ie. https://munnamark.wordpress.com/wp-admin)
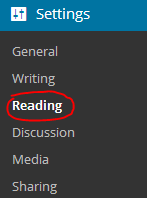
- Go to Settings from the left pane and choose Reading. (As shown in the above image) (ie.https://munnamark.wordpress.com/wp-admin/options-reading.php)
- Now you will get the Reading Settings page.
- Move to the Site Visibility section. There you will get three choices.
- The first choice is the default option. It allows search engines to index your site.
- The second choice forbid search engines to index your site.
- And the third option makes your site private. That means only invited persons will be able to access your site.
- Choose any of the three options that is suitable for you.

Note: You can change the settings at any time.
Adding Users in a Private Site
If you make your site private, then you have to manually invite members to your site. Only invited members is capable of viewing your contents or writing posts in your site. To invite users, follow the steps below:

- Go to your WordPress control Panel
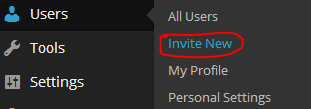
- Choose Users > Invite New (As shown in the above image) (ie. yoursite/wp-admin/users.php?page=wpcom-invite-users)
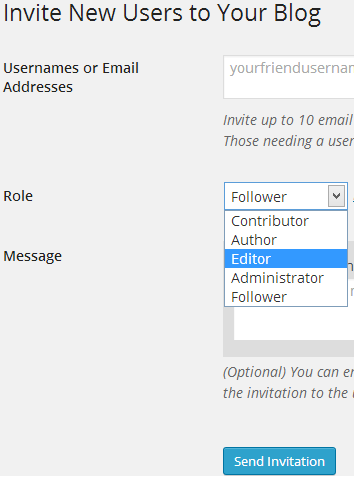
- Now you will get the invite users form. Type username or their emails. Choose one of the five roles (Contributor/ Author/ Editor/ Administrator/ Follower) for the invited members.
- Type an invitation message if necessary
- Finally hit on the Send Invitation button.

Then the invited user will get an email. If he accepts the invitation, you can view the member in the past invitation section. From there you can manage your members.
Hope youve clearly understand the topic. If you have any confusion, dont hesitate to leave a comment. :)
Get more tips on Blogging . . .
Stay with Marks PC Solution to get more interesting IT topics!
Subscribe to:
Post Comments (Atom)
No comments:
Post a Comment
Note: Only a member of this blog may post a comment.