Showing posts with label disk. Show all posts
Showing posts with label disk. Show all posts
Friday, October 10, 2014
How to Create Password Reset Disk

For your computer security you can set start up password. Whenever you turn on PC, Windows ask you to enter password. Then you enter password and get access to the desktop. And all of us know that it is a normal process.
But, if your forget your password? Then what?
You might think experts can easily break it and have access to the PC! And as youre not expert so enter the DVD in the drive and start installing Windows again. And you lose all of your files and folders that is stored on installation drive.
But you can avoid such type of hazard very easily. I dont advise you to write down your pass in the diary or calender. Because this is not safe. Just spend few minutes to create a password reset disk. Its safe and easy. And there is no risk. Follow the steps below:
- First make sure youve connected your USB Flash Drive in the port. You dont need to format the disk. And your files will not be affected.
- Then go to the User Accounts from Control Panel.
- Now hit on the Create a password reset disk option from the left panel.
- Youll see Forgotten Password Wizard. Click Next.
- Select the drive that is to be used as reset disk. Click Next.
- Enter the current password if any. Otherwise leave it blank.
- Click next and wait for the processing. Click Next again. Then Finish.
The disk is ready for use. Now open your USB drive and look for a 2 KB file named userkey.psw. This is the file that can help you to reset the password. Dont delete it.
Now restart your PC and try to access by entering a wrong password. Youll see the Reset Password option. Click on it and type a new password. And from now you can use this password.
You can change your password as many time as you wish by the same disk.
 |
| Click to enlarge image |
Caution: Anyone can change your password if he knows about your reset disk. So make sure that unauthorized person is not familiar with your reset disk.
NB: This system has been tested on Windows 7 and 8. And it will work only on that PC from where the disk is created.
Fun Fact: Youve to create this disk before forgetting password. After forgetting this password, you cant create this disk.
Stay with Marks PC Solution to get more interesting IT topics!

Sunday, September 28, 2014
How to Create Bootable Windows Disk

Hello Windows lovers? How are you? Today I am gonna share how to copy a bootable Windows disk I mean how to back up a Windows CD/ DVD disk. Suppose you purchased a Windows from Microsoft costing $200 and it doesnt work anymore after installing Windows for few times. Is it fair? Not at all - lets punish Microsoft!!
Necessary Tools
- Windows Installation CD/ DVD (Maybe Windows 8, 7 or XP)
- Blank Recordable CD/ DVD as per your requirement (CD for Windows XP Only)
- At least one DVD Writer (Or two if available)
- Burning Software like Nero or Infra Recorder (Im gonna use Infra)
- And of course a PC user with sufficient operating knowledge!
And you should know, if you simply copy a Windows disk and burn it to another blank disk, then you will get something on that disk. But it will not be usable. Even if youre able to start installing Windows from running condition, it will be stopped installing after reboot. That means your disk will not be bootable. And you will not be able to set up Windows from a non bootable disk. So you have to create a data disk which will be bootable. Hope you got my point.
Here, for the purpose of this tutorial, Im gonna use Windows 8 Pro and Infra Recorder as burning software. So I will use the word Windows 8 and Infra Recorder evrywhere. But it applies for other versions of Windows too.
You can also use Nero. But always remember, whatever you do, you have to create a data disk.
Lets Start
- Insert your Windows 8 Disk into the DVD Drive
- Now run Infra Recorder (Please download if you dont have it. Its free)
- Go to the Menu bar > Actions > Copy Disk > To a Disk Image . . .
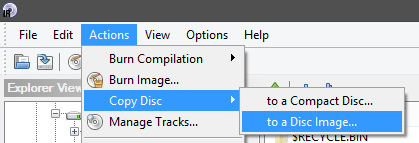
Now you will get another window as below -
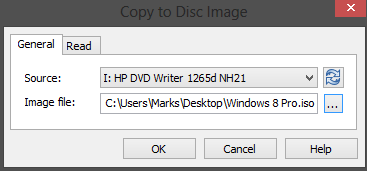
Preparing the ISO File
Now select your source file I mean the Windows 8 Disk location. Normally it detects your drive automatically. Now manually choose the destination of your Windows Image file (ISO file), name it as Windows 8.iso and hit OK. Now copying will be started. Wait for the task to be finished. It may take few minutes. After completing the task, Windows disk will be ejected automatically. And you will get an iso image of your Windows.
Now insert a blank DVD in the drive. The size of a single layer DVD is usually 4.7 GB. Try to use a good disk. Otherwise it will not be durable.
Burning the Image to Blank DVD
Go to the Infra Recorder again and choose Burn Image from Actions menu. Locate Windows 8.iso from your hard disk and open it. Choose the drive which contains blank DVD and hit OK. And the burning process will be started immediately.
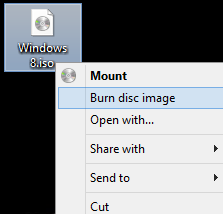
You can also burn through Windows 8. No third party software is needed. If you have previously saved copy of a Windows iso image then you dont need Nero or Infra Recorder. Simply click right mouse button over the Windows.iso file and choose Burn Disk Image. Choose your DVD drive and start burning!
Caution
Now insert a blank DVD in the drive. The size of a single layer DVD is usually 4.7 GB. Try to use a good disk. Otherwise it will not be durable.
Burning the Image to Blank DVD
Go to the Infra Recorder again and choose Burn Image from Actions menu. Locate Windows 8.iso from your hard disk and open it. Choose the drive which contains blank DVD and hit OK. And the burning process will be started immediately.
You can also burn through Windows 8. No third party software is needed. If you have previously saved copy of a Windows iso image then you dont need Nero or Infra Recorder. Simply click right mouse button over the Windows.iso file and choose Burn Disk Image. Choose your DVD drive and start burning!
Caution
- Make sure that your master disk is okay and free of scratches.
- Use quality blank disk.
- Before inserting the disk to the drive, gently clean it with a soft tissue paper.
- Any interruption in the power supply during this operation is not acceptable.
If you face any problem, please inform me.
Stay with Marks PC Solution to get more interesting IT topics!
Subscribe to:
Posts (Atom)