Showing posts with label using. Show all posts
Showing posts with label using. Show all posts
Monday, October 20, 2014
Using Word 2007 ribbons for tables
If you only occasionally use Word 2007 (the word processor in Microsoft Office 2007), you might find its ribbons less intuitive than were the menus in earlier versions of Word. This can be especially frustrating while creating and maintaining tables. This document can help you remember where to find, and how to use, various Word 2007 table tools, including its:
- Table icon
- Design ribbon
- Layout ribbon
- Borders and Shading window
Creating a new table- The easiest-to-find Word 2007 table tool is the Table icon that lets you create new tables. To create a new Word 2007 table, do the following:
- Click the Insert tab to display its ribbon as shown in Figure 1 below.
- Double-click the Table icon, and then click Insert Table to display its window as shown in Figure 2 below.
- Select your numbers of columns and rows, and then click OK. For example, as shown in Figure 3 below, you might choose four columns and seven rows.
 |
Figure 1 - The Insert ribbon contains this Table icon. |
 |
Figure 2 - The Insert Table window lets you choose your numbers of columns and rows. |
 |
Figure 3 - This sample new table contains four columns and seven rows. |
Accessing table ribbons - The relatively-easy-to-find Word 2007 Design and Layout table ribbons contain table tools. Placing the text-insertion point (flashing cursor) anywhere within a table displays the yellow Table Tools label and the Design and Layout tabs as shown in Figure 4 below. You can then do either of the following:
- Click the Design tab to display its ribbon as shown in Figure 5 below. The Design ribbon contains tools for formatting the overall table.
- Click the Layout tab to display its ribbon as shown in Figure 6 below. The Layout ribbon contains tools for manipulating columns, rows, and cells.
 |
Figure 4 -The yellow Table Tools label highlights the table ribbon tabs, Design and Layout. |
 |
Figure 5 - The Design table ribbon contains tools for formatting the overall table. |
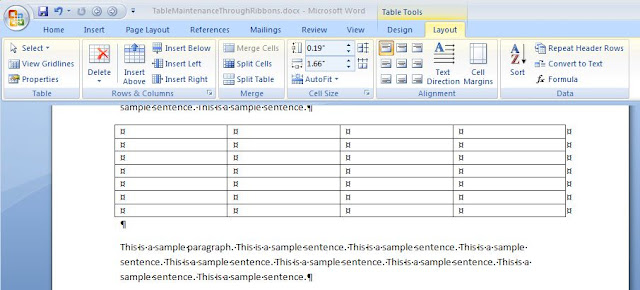 |
| Figure 6 - The Layout table ribbon contains tools for manipulating columns, rows, and cells. |
Note: For another table example table created through ribbons, please see Creating a cumulative status report through MS Word.
Applying borders and shading - The not-so-easy-to-find Word 2007 Borders and Shading window contains traditional, intuitive tools for applying borders, grids, and shading to your selected cells. To access the Borders and Shading window, do the following:
- Place the text-insertion point anywhere within the table you wish to edit.
- Click the Design tab to display its ribbon.
- At the lower-right corner of the Design ribbon, click the small arrow (at the right of Draw Borders) to display the Borders and Shading window as shown in Figure 7 below.
 |
Figure 7 - The Borders and Shading window contains traditional, intuitive tools for applying borders and shading to your selected cells. |

Wednesday, October 8, 2014
Oregon Using the iPad to Assist Disabled Voters

Oregon is testing the iPad to assist disabled voters and allow them to vote privately. Some Oregon voters that are unable to vote using paper ballets will be able to vote using the iPad in tomorrows election as part of a pilot program. Voters with visual impairments, physical disabilities, dyslexia and other disabilities that make voting with paper ballets difficult will be able to vote using a custom iPad app. The app will have the ability to enlarge font size, improve contrast and read text aloud to assist disabled voters. The app also works with VoiceOver for improved accessibility. Blind voters will be able to connect their Braille displays to the iPad via Bluetooth in order to read the ballets. Users that use Bluetooth accessories will be able to connect them to the iPad in order to vote. The app will allow disabled voters to make their selections privately without election officials knowing which candidates the voter selected. Election officials made the following comments about voter privacy.
"Some people want to vote independently, and theyre the ones that were talking to."Laws require people with disabilities to have equal access and privacy while voting.


Friday, October 3, 2014
Make Calculator Using Notepad !!

In this post I am gonna show you another fun of notepad. Here I will show you how to make calculator using notepad.
Copy and paste the following text in notepad.
Now save the file as Calculator.bat. Now double click on the file to open it. Type 2*2 and have fun!@echo offtitle Batch Calculator by (www.munnamark.blogspot.com)color 0c:topecho --------------------------------------echo -Welcome to Batch Calculator by *(Marks PC Solution)!-echo --------------------------------------echo Enter your operandecho.set /p sum=set /a ans=%sum%echo.echo = %ans%echo --------------------------------------------------------------pauseclsecho Previous Answer: %ans%goto toppauseexit
Tuesday, September 30, 2014
Using the Kurzweil Virtual Printer
Kurzweil Virtual Printer is a great tool to help read unsupported documents in Kurzweil. It works with any program that you can print from. Hope this tip helps.
Monday, September 29, 2014
Using Unity workspaces in Ubuntu
In the Ubuntu distribution of the Linux operating system, you can use Unity workspaces as virtual desktops. Multiple workspaces simplify complex projects because you need overlap and/or minimize fewer windows.
Adding windows to Unity workspaces - You can add windows to two or more Unity workspaces. To add windows to workspaces, do the following:
- In the Launcher, click the Workspaces icon to display all four workspaces.

- Select a workspace by moving your mouse pointer over it. For example, you can place your pointer over the lower-right workspace.

- Expand your selected workspace to full size by clicking it. Continuing this example, you click the lower-right workspace to expand it.
- Open a window in your expanded workspace. Continuing this example, you can open a browser and go to an educational website.


- Repeat steps 1 through 4 for other workspaces. Continuing this example, you might open two new LibreOffice documents, such as a Writer text document in the upper-left workspace, and a Calc spreadsheet in the upper-right workspace.


Note: You need not use all four workspaces. In this example, the lower-left workspace contains no windows.
Moving windows among Unity workspaces - You can move any window to any other workspace. To move a window from one workspace to another, do the following:
- Click the Workspaces icon, click a workspace to open it, and then select the window you want to move to another workspace. For example, you can select the LibreOffice Writer document in the upper-left workspace.
- Press Ctrl+Alt+Shift and press an arrow key to move the window. Continuing this example, you can press ↓ to move the Writer document the to lower-left workspace.
- Click the Workspaces icon to verify that you have moved the window as intended.

- Repeat steps 1 through 3 for any other window you wish to move to another workspace.

Removing windows from Unity workspaces - After you finish using your workspaces, make sure you save all documents and close each window in every workspace. This guards against losing edits when when you shut down or restart your PC.
Subscribe to:
Posts (Atom)