Showing posts with label word. Show all posts
Showing posts with label word. Show all posts
Sunday, October 26, 2014
How to Solve an Error “Cannot open Documents The” of MS word
-->
When MS word gets corrupt, it givesseveral types of error while opening it. Error message is depend oncause of corruption. You will receive different type of error messagein different scenario. Here I am providing solution for “Cannotopen "DocumentsThe” error message which you will get,when you try to open MS word file. Along with this error message youmay get few massages which are written below...
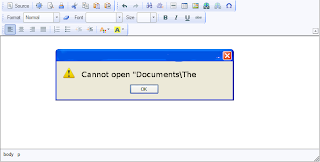
“Cannot open C:My”
“Cannot open "Test.doc"”
Main Cause of the problem: MS wordcorruption is not basic cause of this type of error. The main causeof this problem is registration of your MS word version is get expireand you need to re-register to fix this problem. The process ofre-registering is very easy and you can perform it very easily.
You can use bellow written method on MSword 97 and above version
- Boot your system.
- Click on Start --> Run
- When run box open type winword /r command and hit Enter.
Note: Dont forget to place space before forward slash.
After re-registering process is overthen double click on MS word file. You will able to open MS word file without any error. In case problem still persist then it signify that your word file is severely corrupted and in that case you need to some advance MS word repair software.
Monday, October 20, 2014
Using Word 2007 ribbons for tables
If you only occasionally use Word 2007 (the word processor in Microsoft Office 2007), you might find its ribbons less intuitive than were the menus in earlier versions of Word. This can be especially frustrating while creating and maintaining tables. This document can help you remember where to find, and how to use, various Word 2007 table tools, including its:
- Table icon
- Design ribbon
- Layout ribbon
- Borders and Shading window
Creating a new table- The easiest-to-find Word 2007 table tool is the Table icon that lets you create new tables. To create a new Word 2007 table, do the following:
- Click the Insert tab to display its ribbon as shown in Figure 1 below.
- Double-click the Table icon, and then click Insert Table to display its window as shown in Figure 2 below.
- Select your numbers of columns and rows, and then click OK. For example, as shown in Figure 3 below, you might choose four columns and seven rows.
 |
Figure 1 - The Insert ribbon contains this Table icon. |
 |
Figure 2 - The Insert Table window lets you choose your numbers of columns and rows. |
 |
Figure 3 - This sample new table contains four columns and seven rows. |
Accessing table ribbons - The relatively-easy-to-find Word 2007 Design and Layout table ribbons contain table tools. Placing the text-insertion point (flashing cursor) anywhere within a table displays the yellow Table Tools label and the Design and Layout tabs as shown in Figure 4 below. You can then do either of the following:
- Click the Design tab to display its ribbon as shown in Figure 5 below. The Design ribbon contains tools for formatting the overall table.
- Click the Layout tab to display its ribbon as shown in Figure 6 below. The Layout ribbon contains tools for manipulating columns, rows, and cells.
 |
Figure 4 -The yellow Table Tools label highlights the table ribbon tabs, Design and Layout. |
 |
Figure 5 - The Design table ribbon contains tools for formatting the overall table. |
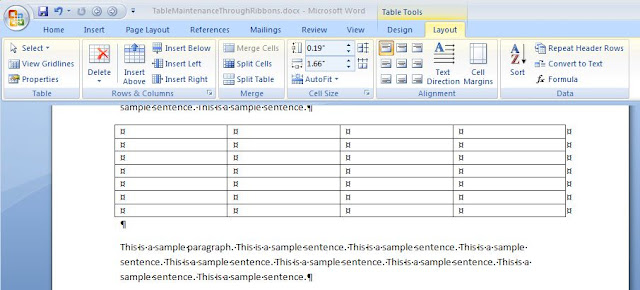 |
| Figure 6 - The Layout table ribbon contains tools for manipulating columns, rows, and cells. |
Note: For another table example table created through ribbons, please see Creating a cumulative status report through MS Word.
Applying borders and shading - The not-so-easy-to-find Word 2007 Borders and Shading window contains traditional, intuitive tools for applying borders, grids, and shading to your selected cells. To access the Borders and Shading window, do the following:
- Place the text-insertion point anywhere within the table you wish to edit.
- Click the Design tab to display its ribbon.
- At the lower-right corner of the Design ribbon, click the small arrow (at the right of Draw Borders) to display the Borders and Shading window as shown in Figure 7 below.
 |
Figure 7 - The Borders and Shading window contains traditional, intuitive tools for applying borders and shading to your selected cells. |
Saturday, October 11, 2014
HOW TO DRAW A PIE CHART IN MS WORD PART 1
MICROSOFT WORD DRAWING PROJECT No. 18 PART 1
TITLE: HOW TO DRAW A PIE CHART IN MS WORD
TYPE: MATHEMATICS DIAGRAM

A pie chart is also known as a circular graph. The circle is divided from the centre into several parts or sectors and each sector represents a proportion of the whole volume, amount or size of the data. The pie chart can be used in other subjects other than Mathematics. Drawing a pie chart which has no colours is not a difficult task. Actually, the real challenge is when you want to draw a coloured pie chart where each sector is filled with a different colour. Anyway, there is a way to do it in MS Word as you can see in the illustration above. Can anyone tell me how it is done? I believe that nothing beats the satisfaction of being able to create something on your own and knowing how to do it. Personally, I like to create my own clip art images with MS Word to be used in PowerPoint slides.
Monday, October 6, 2014
HOW TO CREATE GRAPHIC DESIGN IN MS WORD
MICROSOFT WORD DRAWING PROJECT No. 37
TITLE: HOW TO CREATE A DESIGN FOR AN APRON IN MS WORD
TYPE: GRAPHIC DESIGN
What do apple and health have in common? They are used in a popular proverb “An apple a day keeps the doctor away”. You have drawn the apron and the apple, then what’s next? Add in the suitable text using WordArt and you have yourself a design. I prefer to use Arial Black typeface because the letters are easy to read. I teach students how to draw Block Letters during Art lessons. The graph paper is useful in teaching students to draw block letters. Two pieces of graph paper are sufficient to draw the letters A to Z. The following Elements of Art were used to create this drawing: Line, Colour, Shape, Form and Space. In addition, the following Principles of Design were also used: Balance, Harmony, and Unity. A good design should be relevant to the theme. Therefore choosing the right illustration and text is important in creating a good design.

Now, let’s put the design on a t-shirt and see how it looks? What do you think?

Tuesday, September 30, 2014
HOW TO DRAW A COFFEE MUG IN MS WORD
MICROSOFT WORD DRAWING PROJECT NO. 2
TITLE: A COFFEE MUG ON A COASTER
TYPE: ILLUSTRATION

The tools needed to create the coffee mug are as follows: Can; Oval; Donut; Heart and Curve line. Draw a shape with the Curve line and then insert a picture into it by doing the following: Shape Fill > Picture > Select a picture from a folder > Insert. To create the shadow effect, click the Oval shape at the bottom and then do the following: click Shadow Effects > Drop Shadow > Shadow Style 3 and then nudge the shadow into place using the Shadow Settings. Use the Edit Points function to adjust and fine-tune the curve lines.

Monday, September 29, 2014
HOW TO DRAW A LIGHTED CANDLE IN MS WORD
MICROSOFT WORD DRAWING PROJECT No. 23 PART 1
TITLE: HOW TO DRAW A LIGHTED CANDLE IN MS WORD
TYPE: GRAPHIC DESIGN
This design can be used in many ways. I’m just trying to show how this illustration is created in MS Word. Sometimes when there is a blackout in my area due to power failure, I will light up some candles to lighten the place up. I like to put the candles on metal container covers and tin cans. Hence, this experience gave me the idea for this graphics project. The picture below shows a lighted candle placed in a tin can filled with sand. You can also see that the candlelight is in four subtle shades of yellow. How do you create these tonal values?
Here are some tips for readers to try drawing this at home. The tools needed to create this drawing are as follows: Oval, Can, Curve line, and Rectangle. By the way, make use of the Fill Effects and More Fill Colors options to add shading and decorative effects to the illustration.

Word Paragraph Spacing
Paragraph Spacing in Microsoft Word 2007, 2010 and 2013
Run Word 2007/2010/2013, click the "Home" tab on the ribbon and navigate to the "Change Styles" item under the Styles options. And then click this item, there will pop up a drop-down menu, in which the "Paragraph Spacing" is at the bottom obviously. Point to the "Paragraph Spacing" item in the menu, and a Built-In dialog will appear, where we can edit, set and custom Paragraph Spacing on word 2010.
 |
| Word 2010 Paragraph Spacing |
HOW TO DRAW A BREAD TOASTER IN MS WORD Part 1
MICROSOFT WORD DRAWING PROJECT No. 53 Part 1
TITLE: HOW TO DO A PERSPECTIVE DRAWING OF A BREAD TOASTER IN MS WORD
TYPE: GRAPHIC ART – DIGITAL DRAWING
A good product design has to be aesthetically pleasing, ergonomic and functionally useful. Applying good ergonomics to a design makes the product comfortable and efficient for the benefit of the users. This bread toaster design is angular in shape. It should have rounded edges and corners. I have to admit that this is not a good design because it’s not ergonomic. As far as human factor is concerned, we are never comfortable being around objects with sharp edges and corners. I don’t think that many people would like to buy a bread toaster designed like that. But this drawing provides a good exercise on perspective and proportion. In this project, I’ll leave aesthetics and ergonomics aside and instead focus on sharpening the drawing skills. Use a mouse to draw this picture for better result. Although this drawing is very basic but drawing it with the right proportion especially with a mouse can be quite a challenge. This is because great precision is needed to create and align the shapes and lines accurately. It also needs tremendous concentration too. The only drawing tool needed for this exercise is the Freeform line tool. Quite frankly, drawing the Happy Egg is much easier than drawing the bread toaster because the placement of drawing objects (to form the image) is not that precise.

This picture was drawn with the Freeform line tool. This three-dimensional bread toaster is viewed below the eye level.

I made used of the perspective lines to help me draw this picture. The perspective lines help us to draw pictures with the right perspective. This system helps us to accurately depict objects as how they are seen in the real world.
HOW TO DETECT UNEVEN / IMPERFECT LINES
Straight and even lines are essential for producing precision drawings.


Sunday, September 28, 2014
Why MS Word File Crash on Opening
Is MS word document close soon after you open it? If yes, then read this post to know the cause and solution to overcome this problem.
It might be possible that template got corrupted but other there could be more reasons. So let us first verify Is this due to template corruption or something else.
To verify it, Start MS word without template and add-ins loaded. Follow the steps to do so.....
Note: Remember to place space before foreword slash. In case you miss it then error can occur, “/a” stands for troubleshooting tool only. If your error got fix then it means either your Normal template or one of the files in Words Startup path are probably corrupt, so you need to try these steps:
1) Try to Rename the Normal template. In word 2007 normal template have .dotx or dotm extension.
2) For example, try to rename Normal.dot to Normal.old. It is advisable to keep only one Normal.dot file.
In case it doesnt work for you then try another method given below:
If you have template corruption problem then above written method will resolve it and word file will stop crashing. But in the case document behave in the same way then it signify that cause of problem is different and you need to apply suitable method to fix word file overcome.
It might be possible that template got corrupted but other there could be more reasons. So let us first verify Is this due to template corruption or something else.
To verify it, Start MS word without template and add-ins loaded. Follow the steps to do so.....
- Click Start and then click on Run.
- Write winword.exe /a in Run box and hit enter.
Note: Remember to place space before foreword slash. In case you miss it then error can occur, “/a” stands for troubleshooting tool only. If your error got fix then it means either your Normal template or one of the files in Words Startup path are probably corrupt, so you need to try these steps:
1) Try to Rename the Normal template. In word 2007 normal template have .dotx or dotm extension.
2) For example, try to rename Normal.dot to Normal.old. It is advisable to keep only one Normal.dot file.
In case it doesnt work for you then try another method given below:
- Move any file from Words startup path to other folder.
- Renaming any files in Words Startup path from [filename].dot to [filename].old.
- You can find the location Words Startup folder under Tools + Options + File location.
- If you have any doubts then move the files instead renaming them.
If you have template corruption problem then above written method will resolve it and word file will stop crashing. But in the case document behave in the same way then it signify that cause of problem is different and you need to apply suitable method to fix word file overcome.
Word 2010 Line spacing
How to Set Line Spacing in Word 2010, Word 2013
In Word changing the line spacing in a Word 2010 document inserts extra space between all lines of text in a paragraph. Because Word adds the space below each line of text in the paragraph, the last line in the paragraph will also have a little extra space after it in the package.
Setting line spacing
We can easily change the line spacing in the current paragraph or all the paragraphs youve selected as a block:
- Click the Line Spacing command button.
Word Line Spacing A menu listing common line-spacing commands appears. - Choose a new line-spacing value from that list.The line spacing for the current paragraph or selected paragraphs changes.

Word sets line spacing at 1.15 as its standard, or default. Supposedly, that extra .15 lines of text makes text more readable than using single spacing, or 1.0. In double spacing, or the line spacing value 2.0, one line of text appears with one blank line below it. Triple spacing, 3.0, makes one line of text appear with two blank lines below it.
Ah! The keyboard shortcuts:
- Single-spaced lines: Press Ctrl+1.
- Double-spaced lines: Press Ctrl+2.
- 1-1/2-spaced lines: Press Ctrl+5.Use the 5 key on the typewriter area of the computer keyboard. Pressing Ctrl and the 5 key on the numeric keypad activates the Select All command.
There’s no such thing as having no line spacing. If you want to "remove" fancy line spacing, select some text and press Ctrl+1 for single spacing.
Setting specific line spacing options
Now to set the line spacing to a value other than the items shown in the Line Spacing buttons menu, you summon the Paragraph dialog box.

We see in the Spacing area of the dialog box, the Line Spacing drop-down list lets you set various line-spacing values: Single, 1.5, and Double, just like the Line Spacing command button menu.
Additional options in the Line Spacing drop-down list require you to also use the At box. Values you set in the At box indicate line spacing:
- At least: The line spacing is set to the specified value, which Word treats as a minimum value. Word can disobey that value and add more space whenever necessary to make room for larger type, different fonts, or graphics on the same line of text.
- Exactly: Word uses the specified line spacing and doesn’t adjust the spacing to accommodate for larger text or graphics.
- Multiple: This option allows you to enter line-spacing values other than those specified in the drop-down list. For example, to set the line spacing to 4, select Multiple from the Line Spacing drop-down list and type 4 in the At box.
Now click the OK button to confirm your settings and close the Paragraph dialog box.
HOW TO DRAW A COLLARED T SHIRT IN MS WORD PART 1
MICROSOFT WORD DRAWING PROJECT No. 15 (PART 1)
TITLE : HOW TO DRAW A COLLARED T-SHIRT IN MS WORD
TYPE : ILLUSTRATION

Try drawing the t-shirt using only the Curve line tool and fine-tune the lines using the Edit Points tool. I’ll show readers how this drawing is created in my next post. I love using the Curve line tool to draw pictures with organic shapes and fluid lines. Drawings created with the Curve line tool look natural and realistic.
Saturday, September 27, 2014
How to Open Damaged Word Document
Sometimes you may get a message that file is corrupted, whereas other times Word would simply say that it cannot open the word file. It means your word document file is get corrupted. It is not necessary that in every corruption scenario you are unable to open your document. So it depends on corruption level. There are many ways to repair corrupt documents but when document is not opening then the steps are different ones:
Solution 1: Open the damaged document in draft mode without updating links
Step 1: Configure Word
- First Start Word.
- View tab> Draft (the Document Views group)
- In Word 2007> Microsoft Office Button> Options.In Word 2010> File Menu> Options.
- Display document content section> Draft font and Picture placeholders check boxes (under Advanced options).
- General section> clear the Update automatic links> OK.
Step 2: Open the damaged document
- After that Start Word.
- In Word 2007> Microsoft Office Button> Open.In Word 2010> File Menu> Open.
- Damaged document> Open.
If you are unable to open your document through this step then go to solution 2.
Solution 2: Insert the document as a file in a new document
Step 1: Create a new blank document
- Microsoft Office Button>New.In Office 2010> File Menu> New.
- Blank document> Create.
Note: You may have to reapply some formatting to the last section of the new document.
Step 2: Insert the damaged document into the new document
- Insert tab> Insert Object> Text From File.
- Insert File dialog box> locate> damaged document> Insert.
Solution 3: Third party word repair software.These two methods are commonly use for repairing corrupt documents which are not opening. If you are still unable to open your documents then in this case you should use third party word repair software. These software repairs corrupt word documents & files after all possible corruption scenarios. I hope you will repair word file with the help of above steps. Good luck!
Keyboard Shortcuts for MS Word All Versions
MS Word is the best program for typing. To accelerate your work there are lots of keyboard shortcuts provided with the program. Some of the important keyboard shortcuts provided by the official support page of Microsoft are listed below:
Command Name Shortcut Keys -------------------------------------------------------- To know more, click here. |
Subscribe to:
Posts (Atom)