Showing posts with label a. Show all posts
Showing posts with label a. Show all posts
Thursday, October 16, 2014
Creating a Redo live CD
You can use the free, open-source Redo Backup and Recovery utility to back up (and, if necessary, restore) all software and data on your PC hard drive. This document can help you create a Redo live CD, though which you can create a full-system backup of any PC that has a single Linux or Microsoft Windows operating system.

Note: As of June, 2012, Redo does not let you back up and recover a dual-boot PC. For example, if you have set up dual-boot Linux and Windows on your PC, you cannot use Redo to back up that PC. However, the free, open-source Clonezilla does let you back up and restore any dual-boot PC.
Downloading and Burning - As I demonstrate in my video above, you can create your CD as follows:
- Go to the Redo website, and then, at the top of the page, click downloadto display the Get Redo Backup page.
- In the section Getting Started - 1. Download the latest live CD image, click the yellow word here to display a SourceForge Redo download page.
- Click Download, and wait until the ISO file has finished downloading.
- Place a blank, writable CD into your optical drive.
- Burn the Redo ISO image to your blank CD. For example, in Ubuntu, you can right-click redobackup-livecd-1.0.3.iso, click Open With Brasero Disc Burner to display the Image Burning Setup window, and then click Burn. For more information, see How to burn a bootable CD or DVD.
Backing up and restoring - The Redo live CD lets you backup and restore the main hard drive on your PC:
- As I explain in Backing up your PC through a Redo live CD, you can back up any single-operating-system PC. Boot your PC through the Redo live CD, which lets you create a backup of the hard drive on that PC. Redo stores the backup on external media, such as an external hard drive.
- Subsequently, as I explain in Restoring your PC through a Redo live CD, you can use your Redo live CD, and the backup on your external drive, to restore the backup to your PC.

Saturday, October 11, 2014
HOW TO DRAW A PIE CHART IN MS WORD PART 1
MICROSOFT WORD DRAWING PROJECT No. 18 PART 1
TITLE: HOW TO DRAW A PIE CHART IN MS WORD
TYPE: MATHEMATICS DIAGRAM

A pie chart is also known as a circular graph. The circle is divided from the centre into several parts or sectors and each sector represents a proportion of the whole volume, amount or size of the data. The pie chart can be used in other subjects other than Mathematics. Drawing a pie chart which has no colours is not a difficult task. Actually, the real challenge is when you want to draw a coloured pie chart where each sector is filled with a different colour. Anyway, there is a way to do it in MS Word as you can see in the illustration above. Can anyone tell me how it is done? I believe that nothing beats the satisfaction of being able to create something on your own and knowing how to do it. Personally, I like to create my own clip art images with MS Word to be used in PowerPoint slides.
Tuesday, September 30, 2014
Marks PC Got a New CPU!

Finally Ive got a new system unit! I purchased the CPU in April 02, 2014. I was very busy with transferring my files from old PC. So I didnt get enough time to write about my new CPU. In this post Im gonna share my experience with you. And I also would like to give you some tips which you can follow before and after buying a new PC.
In fact, Im suffering with my old PC for more than a year. It shuts down without notice. And there is no definite pattern of shutting down. Actually the parts are 5.5 years old. So I didnt think about repairing. Ive purchased a new system unit.
I would like to start with my CPU configuration:
In fact, Im suffering with my old PC for more than a year. It shuts down without notice. And there is no definite pattern of shutting down. Actually the parts are 5.5 years old. So I didnt think about repairing. Ive purchased a new system unit.
I would like to start with my CPU configuration:
- Processor: Intel Core i3-3220, 3.3 GHz (4 CPUs), 3MB Cache
- System/Mainboard: GIGABYTE H61M-S2PV, LGA 1155 (Ultra Durable)
- Memory: Team Elite 4GB DDR3 RAM with 1600 Bus Speed
- Hard Drive: Samsung 1 TB HD 103SM
- DVD Drive: HP DVD Writer 1265
- Casing: San ATX Casing (E011B) with High Watt Power Supply
After assembling the CPU, the seller asked me to power on the system. I pushed the power button but it didnt run! Then he checked the connectors, power cords and everything. My father was there. He advised to check the power switch.
Then the seller used reset switch to turn on the system. And it worked! What happened actually? There was a fault in the power button. After changing the internal connector of the power button, it worked fine.
Total Cost is approximately $ 340. 3-year warranty for Mainboard and CPU. Product lifetime warranty for RAM. Hard Disk and DVD writer get 1 year warranty.
Here is my system rating:

Here is my system rating:
Now Id like to discuss what to do before and after buying a new PC.
Before you Purchase - Think
- What do you do using PC?
- How much heavier your tasks are? Gaming, Graphics or Official Tasks?
- How much you know about configuration? Are you an expert or novice?
- Do you have a familiar PC shop which you can trust? How much expert they are?
Before buying a PC, you must think about these questions. You should also think about warranty. Because computer equipments could be damaged any time. Even best quality product cant guarantee that it wouldnt be damaged. But a good brand can ensure warranty service.
You must think about your activities before purchasing a PC. What type of PC you should buy depends on your tasks. Heavier tasks like graphics, gaming requires a heavier system. But if you only browse Internet and work with Microsoft Office, then dual core PC with 2 GB RAM is enough for you.
If youre expert about PC, then its okay. But if youre just a beginner or dont have much idea about configuration, then you should talk to an expert. Or at least you can talk to a friend who has a good idea.
Finally, choose a better outlet from where you will buy the computer. Never choose a shop which offers low price PC. I swear, you have to suffer with defective parts. Just tell the seller one thing - I need a quality CPU. Price doesnt matter. Because some sellers cut the price to match your budget. And often they give you poor quality parts to reduce the price.
You must also ensure that you will get warranty for important equipments like Motherboard, Processor, RAM, Hard Disk etc.
When you Purchase - Observe
When youre at the purchase point, you should observe the assembling procedure. Make sure that, the person assembling your CPU is an expert. Otherwise equipments could be damaged due to the wrong handling.
- Be sure that every equipment is new. Check the packet before opening an equipment. Make sure that the product is properly sealed in the packet with sticker. If the seal is broken, inform the seller and ask him to give you a new one.
- Check the installation of processor. Make sure that, CPU fan is properly installed.
- There are usually 06 points in a motherboard. Make sure all of them are properly inserted into the casing.
- Be sure that internal connectors are properly connected.
- Check the USB ports with a flash drive if possible and necessary.
- Any loose connections may be the cause of danger. So be sure, there is no loose connections.
- When the assembling is complete, turn on your system properly. And make sure everything is working perfectly.
Before leaving the shop, dont forget to pack your equipments properly. Take the necessary documents - warranty papers, money receipt etc. Take the CD/ DVDs that come with the products. Ask the seller for any advice that can increase your computer life so that you shouldnt come back for warranty!
After you Purchase - Ensure Proper Maintenance
A computer could be a machine. But it needs proper maintenance just like a human body. And you must take some precautionary measures to avoid any occurrence. Here are some tips for you:
- Place the system in a cool and dry place.
- Keep the surrounding area clean to keep the dust minimum.
- Use Voltage Stabilizer and UPS to avoid any damage.
- Connect the cords using a good quality multiplug.
- Place the CPU in a way so that it doesnt touch any other object ie. walls, tables or any other electrical equipments.
- Perform maintenance tasks at a regular interval.
- Clean up your PC properly. Or take help of an expert.
Also read the following posts if necessary:
- Laptop Vs. Desktop: Which One you Should Buy?
- Maintenance Tasks: Extend your PC Life
- Clean up your PC to Avoid Overheating Problem
- Guidelines for Using PC Properly
Stay with Marks PC Solution to get more interesting IT topics!
Adding a logo to a Google Sites website
To add a logo to the header on your Google Sites website, you should create a logo as a GIF file that has a transparent background. As detailed in the procedure below, you can do this through Google Docs, the GNU Image Manipulation Program (GIMP), and Google Sites:
Read more »
- Open Google Docs, click Create new, click Drawing to display an Untitled drawing, click File, click Rename, and then type an appropriate name, such as "TClogo." Note: While using separate components (such as rectangles, circles, and triangles) to create your logo, set the boarder lines to Transparent so that your logo later displays smooth edges.
- Download your new drawing as a JPEG file, use GIMP to crop the logo, save it as a JPEG file (such as TClogo01.jpg), click Image, click Scale Image, set image height to 100 pixels, click Scale, click File, click Save, and then click Save again.

- Click File, click Save As, click Select File Type (By Extension), select PNG image, click Save, and then click Save again.

- Click Colors, click Color to Alpha, click OK, click File, and then click Save. This makes the white background of your logo transparent.

- Click File, click Save As, click Select File Type (By Extension), select GIF image, click Save, click Export, and then click Save.

- Sign into your Google Sites website, click More actions, click Manage site, click Site layout, and then click change logo.

- Select Custom Logo, click Choose File, navigate to and select your GIF logo file (such as TClogo01.gif), click Open, click OK, click Save Changes, and and then click Return to site.
HOW TO DRAW A COFFEE MUG IN MS WORD
MICROSOFT WORD DRAWING PROJECT NO. 2
TITLE: A COFFEE MUG ON A COASTER
TYPE: ILLUSTRATION

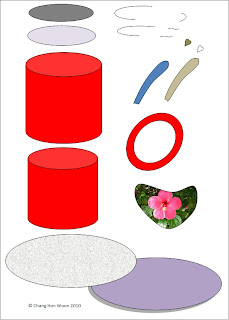
The tools needed to create the coffee mug are as follows: Can; Oval; Donut; Heart and Curve line. Draw a shape with the Curve line and then insert a picture into it by doing the following: Shape Fill > Picture > Select a picture from a folder > Insert. To create the shadow effect, click the Oval shape at the bottom and then do the following: click Shadow Effects > Drop Shadow > Shadow Style 3 and then nudge the shadow into place using the Shadow Settings. Use the Edit Points function to adjust and fine-tune the curve lines.
Trimit Summarizes Any Text into a Couple Sentences
Trimit is an iOS app that summarizes any sized article into a few sentences. The app is free for a limited time so download now. Trimit can take large articles and condense the information into smaller amounts of text. Trimit tries to convey the maximum amount of information it a short amount of text. In order to have an article summarized you type in the URL or copy and paste the text into the app.
"trimit uses a wide variety of heuristics and variables in editing the content to convey the maximum amount of information in the specified length. When summarisng, specified filters can be applied, which include as the addition of acronyms, abbreviations, URL shortening and even removal of vowels that are not integral in the word’s comprehension."Trimit allows you to choose the length of the summarized text. Your summarized documents can be 140 characters to 1000 characters in length. Once your document is summarized you can share it via social media sites. For more information about automatic summarizing tools click here and here.
Source: www.cultofmac.com
Monday, September 29, 2014
HOW TO DRAW A LIGHTED CANDLE IN MS WORD
MICROSOFT WORD DRAWING PROJECT No. 23 PART 1
TITLE: HOW TO DRAW A LIGHTED CANDLE IN MS WORD
TYPE: GRAPHIC DESIGN
This design can be used in many ways. I’m just trying to show how this illustration is created in MS Word. Sometimes when there is a blackout in my area due to power failure, I will light up some candles to lighten the place up. I like to put the candles on metal container covers and tin cans. Hence, this experience gave me the idea for this graphics project. The picture below shows a lighted candle placed in a tin can filled with sand. You can also see that the candlelight is in four subtle shades of yellow. How do you create these tonal values?
Here are some tips for readers to try drawing this at home. The tools needed to create this drawing are as follows: Oval, Can, Curve line, and Rectangle. By the way, make use of the Fill Effects and More Fill Colors options to add shading and decorative effects to the illustration.

How to Solve “This file is not in a recognizable format” Error of MS excel
 Image via Wikipedia
 -->
MS excel is one of the most importantspreadsheet application for computer users. Storing and managing data is very easy with Ms excel. All important data saved inside these excel sheet. Imaging the situation in which you are trying to open an important excel sheet but could not do so, it gives some error. These errors means that your spreadsheet is get corrupt and you need to repair it to repair your valuable data. Excel recovery is required to repair this damaged .xls sheet.
Microsoft offer solution for corrupt excel sheet where you have to link the corrupt spreadsheet with news one. But this solution work hardly ever. So here I am going to explain a solution to easy repair of damaged excel sheet.
Follow the steps given below to:
- Open an undamaged workbook and a new workbook.
- In the Insert menu of new workbook find hyperlink and create link with undamaged workbook. Now close undamaged workbook.
- The link in cell A1 displays the path to the non-corrupted file. Edit the formula in cell A1 by substituting the corrupted file name for the existing one.
- If it works, the corrupted file will open. In this case, copy the formula down and across until the link returns blank cells.
- Select the data, copy it, and choose Paste Special from the Edit menu. In the resulting Paste Special dialog box, click Values and click OK to paste the data over itself. Doing so removes the link formula, but the values returned by the link remain.

Add a Moving Text Bar on Your Blog
Today I will give you a code that is really really useful for bloggers. You have already noticed that this post has been started with a moving text. And from this post youll learn how to add this on your blog.
Before starting I wanna say you, this bar can be used as news headline or notice bar. Or you can use this for any purpose. Its simply an html code that can be place anywhere of your blog. If you place it at the top then it can be used as news bar. You can also put it on the side or bottom of your blog. But make sure youre customizing the size and using the bar properly with the place where you wanna insert it.
Lets start. (Make sure youre using new interface of blogger)
- First, go to the design option from your blogger page.
- Then hit on Layout option from the left panel.
- Now click on Add a Gadget. I suggest to select gadget somewhere from top.
- Now scroll down and choose Html/Java Script then copy and paste the code below.
- Youre done. Save the code and refresh your blog page.
<!-- This Script is from munnamark.blogspot.com, Coded by: Md. Abdur Rahaman--> <div align="center"><font color="#ffffff" size="+1"><marquee bgcolor="#000080"direction="left"loop="20" width="100%"><strong>Visit <a href=http://www.munnamark.blogspot.com>Marks PC Solution</a> to get more interesting Computer and Internet Tips! </strong></marquee></font color="#ffffff"></div> <font face="Arial"><a target="_blank" href="http://www.munnamark.blogspot.com/"><span style="font-size: 7pt; text-decoration: none">Visit Marks PC Solution for Computer and Internet Tips</span></a></font>
- Replace the red text of the code with your text.
- Loop is 20. That means your text will be shown for 20 times. You can either increase or decrease the loop. But if you want the text to be shown for unlimited time then you should delete the this part of the code: loop="20"
- Div align center. You can use right or left.
- Font color is #ffffff. You can choose any font color by changing the value.
- Background color is "#000080". You can choose any color by changing the value.
- Direction is left. You can also use right.
- Width is 100%. You can use 40, 50 or 70% too.
Stay with Marks PC Solution to get more interesting IT topics!
Speak It is a Handy Text To Speech App

Speak-it is a app for iPhone, iPad and iPod Touch. It comes with a couple voices that are of decent quality and has the option to buy more for $0.99 each. Speech-Its best future is that it highlight the word that is being read aloud. To have a passage of text read aloud cut and paste it into the Speak-It app and press read. The app doesnt offer great improvements over iOSs built in VoiceOver but the highlighting feature is very handy. Speak-It also includes a feature to save your an audio file of text. You can make an MP3 file of text if you would like to listen to latter. Speak-It is a available for $1.99 on iTunes.
Recover Data from corrput PDF file by copy data from a damaged fileinto a new file
-->
PDF files are known as one of the most secure data files because owner can set different access levels for different type of uses. PDF documents need less memory space than other documents so these can be easily send through email. But these secure acrobat pdf documents may get corrupt at the time of download or upload. In the case of PDF file corruption there are two possibilities 1) Corrupt file will open but original data will not shown 2) Corrupt file will not open.
In both type of corruption you need to apply some PDF repair methods or use PDF recovery software to access your original data.
Few methods are available to repair corrupt PDF documents. You can copy and paste corrupt data in to new file is one such method. This method works for few cases not for severely damaged cases.
Following are the steps to apply above method..
- Open the damaged file, and then choose Object > Path > Cleanup to remove unwanted items (for example, stray points, unpainted objects, empty text paths) from the artwork.
- If the original file contains multiple layers, choose Paste Remembers Layers from the Layers Panel pop-up menu to ensure the artwork appears on the same layers when you paste it into the new file.
- Using the Selection tool, drag a marquee around the artwork.
- Choose Edit > Copy.
- Choose File > New to create a new file.
- In the new file, choose Edit > Paste In Front to paste the artwork in the correct position on the page.
- Choose File > Save.
This method will probably repair your corrupt PDF file. In case this method didnt work for you then use appropriate PDF repair software to get access of original data. You need to select an advanced repair tool which is compatible with your system configuration.
HOW TO DRAW A BREAD TOASTER IN MS WORD Part 1
MICROSOFT WORD DRAWING PROJECT No. 53 Part 1
TITLE: HOW TO DO A PERSPECTIVE DRAWING OF A BREAD TOASTER IN MS WORD
TYPE: GRAPHIC ART – DIGITAL DRAWING
A good product design has to be aesthetically pleasing, ergonomic and functionally useful. Applying good ergonomics to a design makes the product comfortable and efficient for the benefit of the users. This bread toaster design is angular in shape. It should have rounded edges and corners. I have to admit that this is not a good design because it’s not ergonomic. As far as human factor is concerned, we are never comfortable being around objects with sharp edges and corners. I don’t think that many people would like to buy a bread toaster designed like that. But this drawing provides a good exercise on perspective and proportion. In this project, I’ll leave aesthetics and ergonomics aside and instead focus on sharpening the drawing skills. Use a mouse to draw this picture for better result. Although this drawing is very basic but drawing it with the right proportion especially with a mouse can be quite a challenge. This is because great precision is needed to create and align the shapes and lines accurately. It also needs tremendous concentration too. The only drawing tool needed for this exercise is the Freeform line tool. Quite frankly, drawing the Happy Egg is much easier than drawing the bread toaster because the placement of drawing objects (to form the image) is not that precise.

This picture was drawn with the Freeform line tool. This three-dimensional bread toaster is viewed below the eye level.

I made used of the perspective lines to help me draw this picture. The perspective lines help us to draw pictures with the right perspective. This system helps us to accurately depict objects as how they are seen in the real world.
HOW TO DETECT UNEVEN / IMPERFECT LINES
Straight and even lines are essential for producing precision drawings.


Sunday, September 28, 2014
What a Larger Screen iPhone Means for Accessibility
The general consensus is that Apple will introduce new iPhones with larger screens in a few days. With many people with disabilities using Apples flagship device for their accessibility needs a change can have a large impact on users. From a software prospective iOS 8 will offer many accessibility improvements, but hardware is also an important aspect of accessibility. The larger screen will certainly benefit some users with special needs, but may also cause problems for others.
Users with low vision may benefit the most from the larger viewing area. On current iPhones, with large text enabled, only a small amount of text is able to fit on screen. A larger screen will allow more text to fit on screen requiring less scrolling for users who prefer or require large text. The large screen will also give VoiceOver users more space to use three or four finger gestures.
.PNG)
On the other hand a larger screen iPhone may pose a challenge. Users with physical challenges may have a difficult time reaching all the controls. Also users who prefer using their phone in one hand and users who can only use one hand to operate their phone may find it difficult access all areas of the screen. It is possible that Apple will come up with a software solution to these possible challenges, making one handed use a breeze.
When Apple introduced the iPhone 5 it claimed that the larger screen was a perfect size for one handed, use so it will be interesting to see how the next iPhone is marketed.
People who use Apple devices as assistive devices should be excited about the companys upcoming announcement. Regardless of any hardware changes Apples iOS 8 includes unmatched accessibility features for people with a variety of needs. The potentially larger screen size will likely benefit most users. The benefits and trade-offs of larger screen phones has been explored with Android phones for years, and hopefully Apple has been able to iron out any lasting challenges. Aside from the form factor, Apple may introduce new software or hardware features that impact people with disabilities at their event. Stay tuned for information about how Apples announcements impact accessibility.
HOW TO DRAW A COLLARED T SHIRT IN MS WORD PART 1
MICROSOFT WORD DRAWING PROJECT No. 15 (PART 1)
TITLE : HOW TO DRAW A COLLARED T-SHIRT IN MS WORD
TYPE : ILLUSTRATION

Try drawing the t-shirt using only the Curve line tool and fine-tune the lines using the Edit Points tool. I’ll show readers how this drawing is created in my next post. I love using the Curve line tool to draw pictures with organic shapes and fluid lines. Drawings created with the Curve line tool look natural and realistic.
Saturday, September 27, 2014
How to solve error message “Can not open file it does not seem to be a valid archive” of corrupt zip file
The extension of Zip files is . "Zip" or ".ZIP" file and MIME (Multipurpose Internet Mail Extensions) media type application. Sometimes there are certain errors in Zip file, which occur due to some problems of the Internet. These errors usually occur when you download the Zip file, which leads to corruption. As a result of corruption, the data stored in the Zip file is inaccessible. To overcome such situations, you can restore data from a recent backup. However, if you do not stored a backup or the backup is corrupted, then you need to use zip recovery software files to recover your data.

Suppose you are trying to download attached zip files from outlook, you can not do so and get a message
"Can not open file: it does not seem to be a valid archive. If you downloaded this file, try downloading the file again."
The data stored in the zip file, becomes inaccessible after the occurrence of above error message.
Reason for error message:
The above situation usually occurs when HTTP compression is enabled in the Web Sites properties of Microsoft Internet Information Services (IIS) virtual server in outlook. As a result, when you download a zip file, IIS GZIP encoded as the browser client and passes the file directly to the decompression program, without GZIP decoding the file.
Resolution:
To solve the above problem you can chang the MIME type for the file. Zip application / x-zip-compressed to application / octet-stream. To do this, follow these steps:
* In the Start menu, select Internet Information Server (IIS) in the Administrative Tools option.
* Then, expand the server (local computer), click Web Sites and click Properties.
* Click on the MIME types and scroll through the list of registered MIME types to find the entry of . Zip.
* Then you must click zip Application/x- Zip compressed entry and then click Edit.
* Change the value of MIME type application / octet-stream.
* Finally, stop and restart the IIS Admin Service to apply the changes.
In most cases, given the previous resolutions will help you resolve problems with zip. But if the problem persists, then Zip Repair files to recover and restore corrupted data. The zip repair algorithms incorporate powerful scanning; these Zip Repair applications ensure complete recovery and restoration of your data.
"Can not open file: it does not seem to be a valid archive. If you downloaded this file, try downloading the file again."
The data stored in the zip file, becomes inaccessible after the occurrence of above error message.
Reason for error message:
The above situation usually occurs when HTTP compression is enabled in the Web Sites properties of Microsoft Internet Information Services (IIS) virtual server in outlook. As a result, when you download a zip file, IIS GZIP encoded as the browser client and passes the file directly to the decompression program, without GZIP decoding the file.
Resolution:
To solve the above problem you can chang the MIME type for the file. Zip application / x-zip-compressed to application / octet-stream. To do this, follow these steps:
* In the Start menu, select Internet Information Server (IIS) in the Administrative Tools option.
* Then, expand the server (local computer), click Web Sites and click Properties.
* Click on the MIME types and scroll through the list of registered MIME types to find the entry of . Zip.
* Then you must click zip Application/x- Zip compressed entry and then click Edit.
* Change the value of MIME type application / octet-stream.
* Finally, stop and restart the IIS Admin Service to apply the changes.
In most cases, given the previous resolutions will help you resolve problems with zip. But if the problem persists, then Zip Repair files to recover and restore corrupted data. The zip repair algorithms incorporate powerful scanning; these Zip Repair applications ensure complete recovery and restoration of your data.
HTML Tutorial 1 Creating a Simple HTML Document
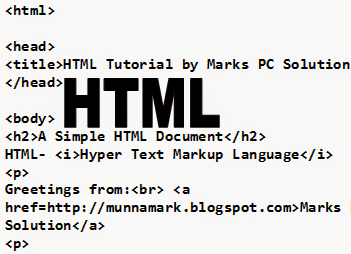
If youre regular in this site, you should know I am not a programmer. Several times, Ive mentioned that Im a person with no programming knowledge. Even my HTML knowledge is not good enough. Just few days ago, I decided to enrich my knowledge on HTML. I will publish HTML lessons for you. Thus you will be also learning HTML with me! Whenever I learn something about HTML, I will publish it here.
Im not gonna discuss about the history of HTML. Hope you all know that HTML- Hypertext Markup Language. Whatever you see on your browser when visiting any site, your browser shows it through HTML. You can easily view what a website includes. Do as below:
- Open any website in your browser.
- Right click on it.
- A menu will appear.
- Click on View Source/ View Page Source.
- A new window will open with the HTML of that website. You will see thousand lines codes! This is how your browser see a website.
Today I would like to start with an example. In this lesson you will learn how to create a simple HTML document. I mean you will get an idea about the basic structure of an HTML document.
Okay lets start. The following texts are the properties of an HTML document.
- Copy the texts, and paste them in a notepad file.
- Save the document as HTML Lesson 1 with .htm or .html extension. I mean the saved file name should look like this: HTML Lesson 1.htm or HTML Lesson 1.html.
- Remember, you can save it by any other word but it should end with .htm or .html extension.
- I recommend you to save the file on your desktop for quick access.
<html>
<head><title>HTML Tutorial by Marks PC Solution.</title></head>
<body><h2>A Simple HTML Document</h2>HTML- <i>Hypertext Markup Language</i><p>Greetings from:<br> <a href=http://munnamark.blogspot.com>Marks PC Solution</a><p>Prepared by: <b>Md. Abdur Rahaman</b><br>©2013 Marks PC Solution<br>Protected by: DMCA
</body></html>
After saving the document a new file will be appeared on your desktop named HTML Lesson 1. Double click on that file. It should be opened with your default net browser. If it doesnt then right click on that file and choose open with a browser.
After opening the document in a browser you will get the following result in the browser window:
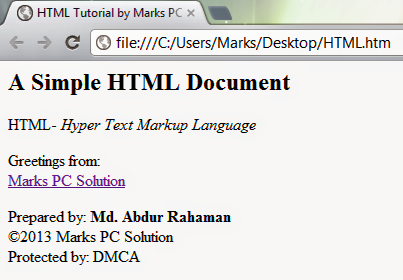
You should notice the difference between your input (HTML Code) and output (Result in the browser). In compared to the HTML you have written on the notepad is more than double what youre getting in the browser window! Are you confused with that? Actually no unnecessary commands are used in the above HTML code. Each and every symbols and characters of the above HTML code are the basic properties of any HTML document. Without them, no HTML document can be prepared.
In my next lesson of HTML, I will discuss about the basic parts of an HTML document. And I will also try to clarify the tags, symbols, codes used in this example. Get ready for that!
Note: In the above code, I have created gaps between parts. After html tag, head tag I have used enter. Basically in the document this space will have no effect. This space is only for your better understanding.
Stay with Marks PC Solution to get more interesting IT topics!
Subscribe to:
Posts (Atom)