Showing posts with label blog. Show all posts
Showing posts with label blog. Show all posts
Wednesday, October 1, 2014
Submit Your Website or Blog in Search Engines for Free

Web developer or blogger already know that it is not a very easy task to drive traffic from search engines. It takes huge time to perform SEO activities for a site. Forum posting, article writing, social connection, back linking, keyword selection and so many tasks need to be performed for SEO.
But the most important task is to submit your site in the search engines. The most popular search engines are Google, Yahoo, Bing etc. Besides there are thousands of small search engines available in the web.
But the submission is a very time consuming task. Specially when you need to submit your site to the search engines one by one. And this is very critical too. For your convenience there are also some sites that make your task easy. All you need to do is just submit your website or blog to those sites and they will automatically submit your site to the search engines.
- Diggza
- Free Web Submission
- Add URL Free
- Add Me
- Submit Express
All of the above sites will submit your web or blog to the search engines for free. The procedure differ slightly. But the basic procedure is same.
- Youve to submit your sites URL and your Email ID.
- Then agree with their terms and conditions.
- Check your Email and confirm submission if asked.
- And resubmit your site once in a month.
Tips:
- You dont need to submit your site in all of the above sites. Choose one or two of them that is suitable for you.
- Use an alternative Email instead of your primary Email. Because you may receive many unnecessary messages from those sites.
- Dont submit your sites very often.
- Only submit your home page URL (ie. http://www.markspcsolution.com).
Stay with Marks PC Solution to get more interesting IT topics!

Monday, September 29, 2014
Add a Moving Text Bar on Your Blog
Today I will give you a code that is really really useful for bloggers. You have already noticed that this post has been started with a moving text. And from this post youll learn how to add this on your blog.
Before starting I wanna say you, this bar can be used as news headline or notice bar. Or you can use this for any purpose. Its simply an html code that can be place anywhere of your blog. If you place it at the top then it can be used as news bar. You can also put it on the side or bottom of your blog. But make sure youre customizing the size and using the bar properly with the place where you wanna insert it.
Lets start. (Make sure youre using new interface of blogger)
- First, go to the design option from your blogger page.
- Then hit on Layout option from the left panel.
- Now click on Add a Gadget. I suggest to select gadget somewhere from top.
- Now scroll down and choose Html/Java Script then copy and paste the code below.
- Youre done. Save the code and refresh your blog page.
<!-- This Script is from munnamark.blogspot.com, Coded by: Md. Abdur Rahaman--> <div align="center"><font color="#ffffff" size="+1"><marquee bgcolor="#000080"direction="left"loop="20" width="100%"><strong>Visit <a href=http://www.munnamark.blogspot.com>Marks PC Solution</a> to get more interesting Computer and Internet Tips! </strong></marquee></font color="#ffffff"></div> <font face="Arial"><a target="_blank" href="http://www.munnamark.blogspot.com/"><span style="font-size: 7pt; text-decoration: none">Visit Marks PC Solution for Computer and Internet Tips</span></a></font>
- Replace the red text of the code with your text.
- Loop is 20. That means your text will be shown for 20 times. You can either increase or decrease the loop. But if you want the text to be shown for unlimited time then you should delete the this part of the code: loop="20"
- Div align center. You can use right or left.
- Font color is #ffffff. You can choose any font color by changing the value.
- Background color is "#000080". You can choose any color by changing the value.
- Direction is left. You can also use right.
- Width is 100%. You can use 40, 50 or 70% too.
Stay with Marks PC Solution to get more interesting IT topics!
Customize Your Blog by Blogger Template Designer
If your site is made by Blogger, then you should be familiar with Blogger Template Designer. This is really a lovely way to redesign your site with custom color, look, layout etc. But many new bloggers dont know about it. Ive already helped some new guys in blogging. Believe it or not, they shared their password with me to redesign their sites!
Today I would like to discuss about Blogger Template Designer, so that new bloggers no longer need to share their passwords with me to redesign their sites. This method is as easy as editing a MS Word Document. :)
The advantages of using blogger template designer are:
- Coding knowledge is not necessary
- Just select and preview your look
- You can easily back to the previous look
What can you do with Template Designer?
With template designer, you can modify the following things:
- Templates: Lets you change your template.
- Background: Allows you to change the background and color.
- Adjust Widths: Change your sites width and sidebar width.
- Layout: You can rearrange your body and footer layout from this option.
- Advanced: Font Style, Size, Color, Gadget Title, Links, Post Footer etc. can be modified from here.
Instruction:
Make sure youre signed in to your blogger account. Now follow the path:
Blogger Dashboard/ Control Panel > Template > Customize. Now youll get the template desinger as follows:
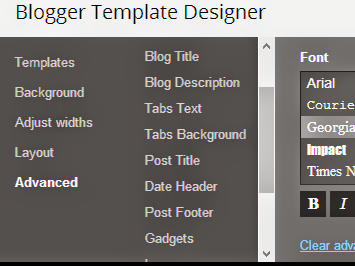
As mentioned earlier, there are 5 options youll get in the left pane. Select one by one and change what you need. You can start from the Template, then Background. Though you can also change your template without entering the template designer.
Adjust Widths: Here you can change the size of your entire blog and sidebar. Do not make it too wide so that it can fit on 1024×768 resolution screen. I prefer 1000 px to 1100 px at best. Right sidebar can be 300 to 320 px.
Layout: If you need to change your layout, this is the right place. You can determine where your sitebar will be located. Where gadgets can be placed. How many gadgets can be placed at the footer etc. Just select the options one by one and observe the change. Then decide whether you will keep the settings or not.
Advanced: The most critical and important part of the template designer. Its just like finalizing a word document. Blog title, description, text color, link color, gadgets, post footer, tabs design - everything can be customize from here.
Before you start editing, you must load the template desinger page properly. And make sure that your sites preview appears on the screen. Otherwise you will not be able to see the changes.
When you change something, it will be displayed in the preview. But settings will be finalized when you hit the Apply to Blog button.
Get More Tips on Blogging . . .
Stay with Marks PC Solution to get more interesting IT topics!
Subscribe to:
Posts (Atom)