Showing posts with label in. Show all posts
Showing posts with label in. Show all posts
Friday, October 31, 2014
Google Authorship Show Yourself in the Search Result !!

If you search Google very often you may notice some search results appear with an image of a person. Basically it is the thumbnail image of the writer of that content. What do you think of it? How does it appear in the Google search result? Other search engines still dont have this feature. Then how/ why it appears in Google search result?

Look at the above image. Search item is- marks pc. And the result is Marks PC Solution. You should notice my picture with the site. You can also enable your picture when your site appears in the search result.
Actually this is a great feature launched by Google. Google named this feature as Google Authorship Program. If you wanna enable this feature for your site then you have to go through few steps which are not very critical at all. I decided to write about it more than a year ago. But failed to publish about it due to the heavy work pressure.
But believe me, for my site, Marks PC Solution, I didnt enable this feature knowingly! Then how does my image appear in the search results? The answer is my Google Plus Profile. Yes, this feature works for that sites which writers have Google Plus Profile.
If you already see your image in the search result with your sites link, then you dont need to do anything more. That means the URL of your Website/ Blog is already linked to your profile. Thus this features is already enabled for you.
About Google Authorship Program
Google authorship program was launched on June 28, 2011. In that time, only a few hundred authors joined this program. Because many people were not familiar with this feature. But day by day, authors are being interested to enable this feature for their sites and contents.
Many of you may think Google considers authorship as a search ranking factor. But to be honest, still it not being used by Google as a search signal. Google uses more than 200 signals to determine search ranking. And in the future authorship program may be used as a search ranking factors.
How to Enable this Feature?
Well this is very easy. All you need is just a Google + Profile with a link of your site in that profile. Also make sure the following issues:
- Make sure you have a high quality Google+ profile picture with a recognizable headshot. I mean your face should be identifiable on that picture.
- Make sure a byline containing your name appears on each page of your site. Have a look at the end of this post- Posted by Abdur Rahaman.
- Make sure byline name and your Google+ profile name are exactly same.
- Make sure that your Google+ email address and your sites email address are same. If your sites email address is different then read more.

If youre sure about the above issues then just do the following:
- Go to your Google+ Profile.
- Then move to the About tab of the profile.
- Now scroll down to the Links section. Look at the above image.
- There are three options available: Other Profiles, Contributor to and Links.
- Hit on the Edit option. See the image below.
- Add your sites name and URL here. See the image below.
- Also add your sites name and URL in the Links too.
- Now save it and wait for your picture to be appeared in the search result. It may take few hours to few days depending on how much time is required by Google to crawl your image.

Finally, though Google doesnt consider authorship program as a search ranking signal, still it might be an important factor in SEO. You can consider this exactly as search description. Often people choose a site from search result by reading the search description of that page. And if the image of an author is familiar to the visitors and if that author is popular among them, then it will be very helpful for the visitors to pick the site from the search results!
So what do you think? Isnt it also important to increase your sites visitors? Enable it now to get advantage!!!
Stay with Marks PC Solution to get more interesting IT topics!

Sunday, October 19, 2014
Add Print as PDF Button in Your Blog!
Sometimes your blog or website reader may wanna save the post as PDF. Or they may want to print it. And there are many free tools to add Save as PDF button. But the problem is that, most of the free tools doesnt allow you to remove the background images of your site. I mean this is not print friendly. As a result whole web page is saved. And this is very irritating.
Today Im sharing a code that is free from this problem. It allows you to save only the text with related image. Lets try this-
- Sign in into your blog. Then go to design.
- From the left panel, hit on the Layout button.
- Now click on Add a Gadget.
- Choose HTML/ JavaScript.
- Now copy and paste the following code into the Content Box.
- Save the gadget and view your blog to see the change!
<script src="http://cdn.printfriendly.com/printfriendly.js" type="text/javascript"></script><script type="text/javascript">document.doAT = function(cl){var myclass = new RegExp("hentry");var myTitleContainer = new RegExp("post-title");var myPostContent = new RegExp("post-footer");var elem = this.getElementsByTagName("div");for (var i = 0; i < elem.length; i++){var classes = elem[i].className;if (myclass.test(classes)){var container = elem[i];for (var b = 0; b < container.childNodes.length; b++){var item = container.childNodes[b].className;if (myTitleContainer.test(item)){var link = container.childNodes[b].getElementsByTagName("a");if (typeof(link[0]) != "undefined"){var url = link[0].href;var index_page = true;}else{var url = document.url;var index_page = false;}if (typeof(url) == "undefined"|| url == "undefined" ){url = window.location.href;var index_page = false;}}if (myPostContent.test(item)){var footer = container.childNodes[b];}}var n = document.createElement("div");if (index_page == true) {var at = <a href= + url + ?pfstyle=wp + style="float:right; margin-right: 1em; color:#6D9F00; text-decoration:none;" class="printfriendly" title="Printer Friendly and PDF"><img style="border:none;" src="http://cdn.printfriendly.com/button-print-grnw20.png" alt="Print Friendly and PDF"/></a>;}else {var at = <a href="http://www.printfriendly.com" style="float:right; margin-right: 1em; color:#6D9F00; text-decoration:none;" class="printfriendly" onclick="window.print(); return false;" title="Printer Friendly and PDF"><img style="border:none;" src="http://cdn.printfriendly.com/button-print-grnw20.png" alt="Print Friendly and PDF"/></a>;}n.innerHTML = at;var origFooter = footer.innerHTML;footer.innerHTML = n.innerHTML + origFooter;footer.style.overflow = "hidden";}}return true;};document.doAT("hentry");</script>
If you wanna place the button at the left side then replace the red colored words as- float:left. And if you are expert in coding like html, CSS, then you can easily place this code anywhere you want.
Code for other Websites Other than Blogger:
<script src="http://cdn.printfriendly.com/printfriendly.js" type="text/javascript"></script><a href="http://www.printfriendly.com" style=" color:#6D9F00; text-decoration:none;" class="printfriendly" onclick="window.print(); return false;" title="Printer Friendly and PDF"><img style="border:none;" src="http://cdn.printfriendly.com/button-print-grnw20.png" alt="Print Friendly and PDF"/></a>

Stay with Marks PC Solution to get more interesting IT topics!
Wednesday, October 15, 2014
New in iOS 8 Built in Braille Keyboard for Six Dot Input

iOS 8 includes enhancements to VoiceOver, the built-in gesture based screen reader for people with visual impairments. One of the improvements is a new built-in Braille Keyboard for Six-Dot input. The new feature is similar to the BrailleTouch app released a few years ago with one major difference; the built-in option can be used to enter text into any app directly. The option can be enabled in the VoiceOver rotor. The Braille keyboard will offer VoiceOver users who are familiar with Braille an alternative, and possibly much faster text entry method. iOS 8 will also offers third-party keyboards such as Fleksy which could also offer significantly faster text input for VoiceOver users.
Once you turn the Braille keyboard on six positions will appear on screen representing the six Braille dots. When the device is held with the screen perpendicular to the floor it automatically enters screen away mode. When using this mode the user faces the screen away allowing three fingers from each hand to contact the screen. As the user begins to type the six virtual dots automatically reposition themselves to compensate for changes in your grip. The dots can also be recalibrated by holding down the three right hand fingers and then the three left hand fingers immediately after. This positions the dots directly under your fingers.
When the device is set on the table or another flat surface the Braille keyboard enters tabletop mode. This mode would seem to be ideal for an iPad can can also be used on smaller devices. It does take some care to ensure that the keyboard does not switch between tabletop and screen away mode accidentally. In both modes typing did seem difficult on the small screen, but some practice seemed to improve typing speed. This new option allows typing with contracted or uncontracted Braille. When typing a swipe right adds a space and a swipe left deletes the last character typed. This new method of typing is very sensitive a will likely require practice before mastering. If you use this feature frequently, it maybe helpful to purchase a case that boarders the screen to avoid trying to type on the bezel.
To enable the Braille keyboard go to Settings > General > Accessibility > VoiceOver > Rotor > Braille Screen Input. Then, when VoiceOver is enabled, rotate the rotor until Braille screen input is selected. It exciting to see all the new third-party keyboard options for iOS 8, but for VoiceOver users, Apples own Braille keyboard maybe the most exciting of all.

Saturday, October 11, 2014
HOW TO DRAW A PIE CHART IN MS WORD PART 1
MICROSOFT WORD DRAWING PROJECT No. 18 PART 1
TITLE: HOW TO DRAW A PIE CHART IN MS WORD
TYPE: MATHEMATICS DIAGRAM

A pie chart is also known as a circular graph. The circle is divided from the centre into several parts or sectors and each sector represents a proportion of the whole volume, amount or size of the data. The pie chart can be used in other subjects other than Mathematics. Drawing a pie chart which has no colours is not a difficult task. Actually, the real challenge is when you want to draw a coloured pie chart where each sector is filled with a different colour. Anyway, there is a way to do it in MS Word as you can see in the illustration above. Can anyone tell me how it is done? I believe that nothing beats the satisfaction of being able to create something on your own and knowing how to do it. Personally, I like to create my own clip art images with MS Word to be used in PowerPoint slides.
Monday, October 6, 2014
HOW TO CREATE GRAPHIC DESIGN IN MS WORD
MICROSOFT WORD DRAWING PROJECT No. 37
TITLE: HOW TO CREATE A DESIGN FOR AN APRON IN MS WORD
TYPE: GRAPHIC DESIGN
What do apple and health have in common? They are used in a popular proverb “An apple a day keeps the doctor away”. You have drawn the apron and the apple, then what’s next? Add in the suitable text using WordArt and you have yourself a design. I prefer to use Arial Black typeface because the letters are easy to read. I teach students how to draw Block Letters during Art lessons. The graph paper is useful in teaching students to draw block letters. Two pieces of graph paper are sufficient to draw the letters A to Z. The following Elements of Art were used to create this drawing: Line, Colour, Shape, Form and Space. In addition, the following Principles of Design were also used: Balance, Harmony, and Unity. A good design should be relevant to the theme. Therefore choosing the right illustration and text is important in creating a good design.

Now, let’s put the design on a t-shirt and see how it looks? What do you think?

Sunday, October 5, 2014
How to Share your presentation Online in PowerPoint 2013
If you to want to meet your client in real time to create a PowerPoint presentation, it was not possible in PowerPoint till now. To make it possible, Microsoft introduced a free public service that is Office Presentation Service in PowerPoint 2013 that creates a complete real time collaboration experience. Lets have a look of this feature:
Sharing a PowerPoint file:
Share your presentation by click on File > Share > Present Online & then select Office Presentation Service then Select the Enable remote viewers to download the presentation check box and click Present Online as shown in figure. This feature enables your client to download the presentation and view the slides on their own.

To send your meeting invitations to your clients, click on Copy Link to copy and paste the meeting hyperlink as shown in picture. Through this, your clients can access it, such as in a Skype chat window. Alternatively, you can send this link through email by selecting Send in Email option or select Send in IM to send using your existing IM chat client.

If you are ready to start present your presentation in front of your clients then just click on Start Presentation button. When your clients click on the hyperlink, a browser window will open and the presentation automatically will display. For this, your clients have no need to install PowerPoint or any other product installed on their computer.
If you want to end this presentation then just press Esc to stop Slide Show View, and then on the Present Online tab, click End Online Presentation.

Click on ‘End Online Presentation, to confirm end presentation.

You can also share a presentation with an embedded video. Your all clients can watch embedded video together.
Thanks for reading this article & take a live experience of this exciting feature by using above steps.
Sharing a PowerPoint file:
Share your presentation by click on File > Share > Present Online & then select Office Presentation Service then Select the Enable remote viewers to download the presentation check box and click Present Online as shown in figure. This feature enables your client to download the presentation and view the slides on their own.
To send your meeting invitations to your clients, click on Copy Link to copy and paste the meeting hyperlink as shown in picture. Through this, your clients can access it, such as in a Skype chat window. Alternatively, you can send this link through email by selecting Send in Email option or select Send in IM to send using your existing IM chat client.
If you are ready to start present your presentation in front of your clients then just click on Start Presentation button. When your clients click on the hyperlink, a browser window will open and the presentation automatically will display. For this, your clients have no need to install PowerPoint or any other product installed on their computer.
If you want to end this presentation then just press Esc to stop Slide Show View, and then on the Present Online tab, click End Online Presentation.
Click on ‘End Online Presentation, to confirm end presentation.
You can also share a presentation with an embedded video. Your all clients can watch embedded video together.
Thanks for reading this article & take a live experience of this exciting feature by using above steps.
Thursday, October 2, 2014
Save Text as Audio File Feature in Mac OS X Lion


Wednesday, October 1, 2014
Submit Your Website or Blog in Search Engines for Free

Web developer or blogger already know that it is not a very easy task to drive traffic from search engines. It takes huge time to perform SEO activities for a site. Forum posting, article writing, social connection, back linking, keyword selection and so many tasks need to be performed for SEO.
But the most important task is to submit your site in the search engines. The most popular search engines are Google, Yahoo, Bing etc. Besides there are thousands of small search engines available in the web.
But the submission is a very time consuming task. Specially when you need to submit your site to the search engines one by one. And this is very critical too. For your convenience there are also some sites that make your task easy. All you need to do is just submit your website or blog to those sites and they will automatically submit your site to the search engines.
- Diggza
- Free Web Submission
- Add URL Free
- Add Me
- Submit Express
All of the above sites will submit your web or blog to the search engines for free. The procedure differ slightly. But the basic procedure is same.
- Youve to submit your sites URL and your Email ID.
- Then agree with their terms and conditions.
- Check your Email and confirm submission if asked.
- And resubmit your site once in a month.
Tips:
- You dont need to submit your site in all of the above sites. Choose one or two of them that is suitable for you.
- Use an alternative Email instead of your primary Email. Because you may receive many unnecessary messages from those sites.
- Dont submit your sites very often.
- Only submit your home page URL (ie. http://www.markspcsolution.com).
Stay with Marks PC Solution to get more interesting IT topics!
Tuesday, September 30, 2014
HOW TO DRAW A COFFEE MUG IN MS WORD
MICROSOFT WORD DRAWING PROJECT NO. 2
TITLE: A COFFEE MUG ON A COASTER
TYPE: ILLUSTRATION

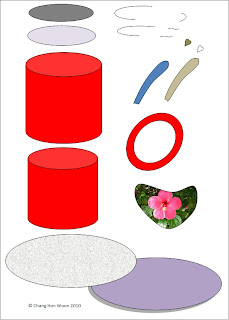
The tools needed to create the coffee mug are as follows: Can; Oval; Donut; Heart and Curve line. Draw a shape with the Curve line and then insert a picture into it by doing the following: Shape Fill > Picture > Select a picture from a folder > Insert. To create the shadow effect, click the Oval shape at the bottom and then do the following: click Shadow Effects > Drop Shadow > Shadow Style 3 and then nudge the shadow into place using the Shadow Settings. Use the Edit Points function to adjust and fine-tune the curve lines.
Monday, September 29, 2014
HOW TO DRAW A LIGHTED CANDLE IN MS WORD
MICROSOFT WORD DRAWING PROJECT No. 23 PART 1
TITLE: HOW TO DRAW A LIGHTED CANDLE IN MS WORD
TYPE: GRAPHIC DESIGN
This design can be used in many ways. I’m just trying to show how this illustration is created in MS Word. Sometimes when there is a blackout in my area due to power failure, I will light up some candles to lighten the place up. I like to put the candles on metal container covers and tin cans. Hence, this experience gave me the idea for this graphics project. The picture below shows a lighted candle placed in a tin can filled with sand. You can also see that the candlelight is in four subtle shades of yellow. How do you create these tonal values?
Here are some tips for readers to try drawing this at home. The tools needed to create this drawing are as follows: Oval, Can, Curve line, and Rectangle. By the way, make use of the Fill Effects and More Fill Colors options to add shading and decorative effects to the illustration.

How to Solve “This file is not in a recognizable format” Error of MS excel
 Image via Wikipedia
 -->
MS excel is one of the most importantspreadsheet application for computer users. Storing and managing data is very easy with Ms excel. All important data saved inside these excel sheet. Imaging the situation in which you are trying to open an important excel sheet but could not do so, it gives some error. These errors means that your spreadsheet is get corrupt and you need to repair it to repair your valuable data. Excel recovery is required to repair this damaged .xls sheet.
Microsoft offer solution for corrupt excel sheet where you have to link the corrupt spreadsheet with news one. But this solution work hardly ever. So here I am going to explain a solution to easy repair of damaged excel sheet.
Follow the steps given below to:
- Open an undamaged workbook and a new workbook.
- In the Insert menu of new workbook find hyperlink and create link with undamaged workbook. Now close undamaged workbook.
- The link in cell A1 displays the path to the non-corrupted file. Edit the formula in cell A1 by substituting the corrupted file name for the existing one.
- If it works, the corrupted file will open. In this case, copy the formula down and across until the link returns blank cells.
- Select the data, copy it, and choose Paste Special from the Edit menu. In the resulting Paste Special dialog box, click Values and click OK to paste the data over itself. Doing so removes the link formula, but the values returned by the link remain.

Using Unity workspaces in Ubuntu
In the Ubuntu distribution of the Linux operating system, you can use Unity workspaces as virtual desktops. Multiple workspaces simplify complex projects because you need overlap and/or minimize fewer windows.
Adding windows to Unity workspaces - You can add windows to two or more Unity workspaces. To add windows to workspaces, do the following:
- In the Launcher, click the Workspaces icon to display all four workspaces.

- Select a workspace by moving your mouse pointer over it. For example, you can place your pointer over the lower-right workspace.

- Expand your selected workspace to full size by clicking it. Continuing this example, you click the lower-right workspace to expand it.
- Open a window in your expanded workspace. Continuing this example, you can open a browser and go to an educational website.


- Repeat steps 1 through 4 for other workspaces. Continuing this example, you might open two new LibreOffice documents, such as a Writer text document in the upper-left workspace, and a Calc spreadsheet in the upper-right workspace.


Note: You need not use all four workspaces. In this example, the lower-left workspace contains no windows.
Moving windows among Unity workspaces - You can move any window to any other workspace. To move a window from one workspace to another, do the following:
- Click the Workspaces icon, click a workspace to open it, and then select the window you want to move to another workspace. For example, you can select the LibreOffice Writer document in the upper-left workspace.
- Press Ctrl+Alt+Shift and press an arrow key to move the window. Continuing this example, you can press ↓ to move the Writer document the to lower-left workspace.
- Click the Workspaces icon to verify that you have moved the window as intended.

- Repeat steps 1 through 3 for any other window you wish to move to another workspace.

Removing windows from Unity workspaces - After you finish using your workspaces, make sure you save all documents and close each window in every workspace. This guards against losing edits when when you shut down or restart your PC.
Record Fall in Apples Profit within Last Decade!

Smartphone giant apple faces a record fall in their quarterly profit within last decade! In the first quarter of this year, Apple earned profit $9.5 billion. And in the previous year, it was $11.6 billion! Gross margin for the quarter was 37.5% compared to 47.4% in the last year.
Market analysts said, Apple could face huge fall in their profit. But the profit earned from iPhone and iPad has saved Apple this time. To be honest, the results were better than many had expected, as strong sales of iPhone and iPad boosted revenues to $43.6 billion. Expert says, due to the increase in competition and declining demands for the products, Apple is facing such challenge.
Apple reported its second quarter result in April 23, 2013. The sales volume of iPhone and iPad were 37.4 million and 19.5 million respectively. In the previous year the number of iPhone sold was 35.1 million and iPad was 11.8 billion. The number of Mac sold is less than 4 million which was exact 4 million in the last year.
Apple CEO, Tim Cook Said-
“We are pleased to report record March quarter revenue thanks to continued strong performance of iPhone and iPad. Our teams are hard at work on some amazing new hardware, software, and services and we are very excited about the products in our pipeline.”
Slowing demand for Apples products during the time of increased competition hurts its share price recently.
"Though weve achieved a credible scale and financial success, we acknowledge that our growth rate has slowed and our margins have decreased from the exceptionally high level we experienced in 2012,"
- Tim Cook, Apple CEO
Tim Cook, while demanding that Apple had always met its own estimates, also mentioned that others had been disappointed recently - and seemed eager to calm investors fears.
But he also made it clear that the next few months will be a lean period, with teams working hard to introduce new products "this fall and throughout 2014".
Apples boss is promising that innovation isnt over at his company - but investors patience will be tested through the summer.
Stay with Marks PC Solution to get more interesting IT topics!
HOW TO DRAW A BREAD TOASTER IN MS WORD Part 1
MICROSOFT WORD DRAWING PROJECT No. 53 Part 1
TITLE: HOW TO DO A PERSPECTIVE DRAWING OF A BREAD TOASTER IN MS WORD
TYPE: GRAPHIC ART – DIGITAL DRAWING
A good product design has to be aesthetically pleasing, ergonomic and functionally useful. Applying good ergonomics to a design makes the product comfortable and efficient for the benefit of the users. This bread toaster design is angular in shape. It should have rounded edges and corners. I have to admit that this is not a good design because it’s not ergonomic. As far as human factor is concerned, we are never comfortable being around objects with sharp edges and corners. I don’t think that many people would like to buy a bread toaster designed like that. But this drawing provides a good exercise on perspective and proportion. In this project, I’ll leave aesthetics and ergonomics aside and instead focus on sharpening the drawing skills. Use a mouse to draw this picture for better result. Although this drawing is very basic but drawing it with the right proportion especially with a mouse can be quite a challenge. This is because great precision is needed to create and align the shapes and lines accurately. It also needs tremendous concentration too. The only drawing tool needed for this exercise is the Freeform line tool. Quite frankly, drawing the Happy Egg is much easier than drawing the bread toaster because the placement of drawing objects (to form the image) is not that precise.

This picture was drawn with the Freeform line tool. This three-dimensional bread toaster is viewed below the eye level.

I made used of the perspective lines to help me draw this picture. The perspective lines help us to draw pictures with the right perspective. This system helps us to accurately depict objects as how they are seen in the real world.
HOW TO DETECT UNEVEN / IMPERFECT LINES
Straight and even lines are essential for producing precision drawings.


Sunday, September 28, 2014
HOW TO DRAW A COLLARED T SHIRT IN MS WORD PART 1
MICROSOFT WORD DRAWING PROJECT No. 15 (PART 1)
TITLE : HOW TO DRAW A COLLARED T-SHIRT IN MS WORD
TYPE : ILLUSTRATION

Try drawing the t-shirt using only the Curve line tool and fine-tune the lines using the Edit Points tool. I’ll show readers how this drawing is created in my next post. I love using the Curve line tool to draw pictures with organic shapes and fluid lines. Drawings created with the Curve line tool look natural and realistic.
Subscribe to:
Posts (Atom)