Showing posts with label creating. Show all posts
Showing posts with label creating. Show all posts
Thursday, October 16, 2014
Creating a Redo live CD
You can use the free, open-source Redo Backup and Recovery utility to back up (and, if necessary, restore) all software and data on your PC hard drive. This document can help you create a Redo live CD, though which you can create a full-system backup of any PC that has a single Linux or Microsoft Windows operating system.

Note: As of June, 2012, Redo does not let you back up and recover a dual-boot PC. For example, if you have set up dual-boot Linux and Windows on your PC, you cannot use Redo to back up that PC. However, the free, open-source Clonezilla does let you back up and restore any dual-boot PC.
Downloading and Burning - As I demonstrate in my video above, you can create your CD as follows:
- Go to the Redo website, and then, at the top of the page, click downloadto display the Get Redo Backup page.
- In the section Getting Started - 1. Download the latest live CD image, click the yellow word here to display a SourceForge Redo download page.
- Click Download, and wait until the ISO file has finished downloading.
- Place a blank, writable CD into your optical drive.
- Burn the Redo ISO image to your blank CD. For example, in Ubuntu, you can right-click redobackup-livecd-1.0.3.iso, click Open With Brasero Disc Burner to display the Image Burning Setup window, and then click Burn. For more information, see How to burn a bootable CD or DVD.
Backing up and restoring - The Redo live CD lets you backup and restore the main hard drive on your PC:
- As I explain in Backing up your PC through a Redo live CD, you can back up any single-operating-system PC. Boot your PC through the Redo live CD, which lets you create a backup of the hard drive on that PC. Redo stores the backup on external media, such as an external hard drive.
- Subsequently, as I explain in Restoring your PC through a Redo live CD, you can use your Redo live CD, and the backup on your external drive, to restore the backup to your PC.

Saturday, September 27, 2014
HTML Tutorial 1 Creating a Simple HTML Document
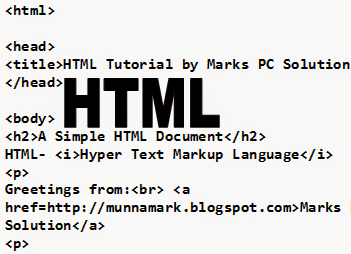
If youre regular in this site, you should know I am not a programmer. Several times, Ive mentioned that Im a person with no programming knowledge. Even my HTML knowledge is not good enough. Just few days ago, I decided to enrich my knowledge on HTML. I will publish HTML lessons for you. Thus you will be also learning HTML with me! Whenever I learn something about HTML, I will publish it here.
Im not gonna discuss about the history of HTML. Hope you all know that HTML- Hypertext Markup Language. Whatever you see on your browser when visiting any site, your browser shows it through HTML. You can easily view what a website includes. Do as below:
- Open any website in your browser.
- Right click on it.
- A menu will appear.
- Click on View Source/ View Page Source.
- A new window will open with the HTML of that website. You will see thousand lines codes! This is how your browser see a website.
Today I would like to start with an example. In this lesson you will learn how to create a simple HTML document. I mean you will get an idea about the basic structure of an HTML document.
Okay lets start. The following texts are the properties of an HTML document.
- Copy the texts, and paste them in a notepad file.
- Save the document as HTML Lesson 1 with .htm or .html extension. I mean the saved file name should look like this: HTML Lesson 1.htm or HTML Lesson 1.html.
- Remember, you can save it by any other word but it should end with .htm or .html extension.
- I recommend you to save the file on your desktop for quick access.
<html>
<head><title>HTML Tutorial by Marks PC Solution.</title></head>
<body><h2>A Simple HTML Document</h2>HTML- <i>Hypertext Markup Language</i><p>Greetings from:<br> <a href=http://munnamark.blogspot.com>Marks PC Solution</a><p>Prepared by: <b>Md. Abdur Rahaman</b><br>©2013 Marks PC Solution<br>Protected by: DMCA
</body></html>
After saving the document a new file will be appeared on your desktop named HTML Lesson 1. Double click on that file. It should be opened with your default net browser. If it doesnt then right click on that file and choose open with a browser.
After opening the document in a browser you will get the following result in the browser window:
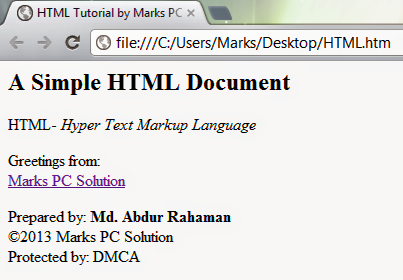
You should notice the difference between your input (HTML Code) and output (Result in the browser). In compared to the HTML you have written on the notepad is more than double what youre getting in the browser window! Are you confused with that? Actually no unnecessary commands are used in the above HTML code. Each and every symbols and characters of the above HTML code are the basic properties of any HTML document. Without them, no HTML document can be prepared.
In my next lesson of HTML, I will discuss about the basic parts of an HTML document. And I will also try to clarify the tags, symbols, codes used in this example. Get ready for that!
Note: In the above code, I have created gaps between parts. After html tag, head tag I have used enter. Basically in the document this space will have no effect. This space is only for your better understanding.
Stay with Marks PC Solution to get more interesting IT topics!
Subscribe to:
Posts (Atom)