Wednesday, October 22, 2014
Apple Releases iOS 7 1 with Numerous Accessibility Tweaks

Today, Apple released iOS 7.1 with numerous accessibility improvements. While these features are not as exciting as the accessibility features added in major releases of iOS they still offer advantages for many users. Most of the improvements focus on making the new iOS interface easier to see for people with visual impairments. Turning on bold text now makes the keyboard, calculator, and in app icons bold in addition to text. A new option found under the accessibility menu allows users to turn on button shapes which makes it easier to distinguish text from buttons. In addition to limiting the parallax effect, reduce motion now limits multitasking animations and animations in the weather and messages apps. iOS 7.1 also allows users to darken colors used in apps to make them easier to view and increase the white point of the display to cut down on glare.
.PNG "button shapes") |
| Button Shapes |
iOS 7.1 also includes a number of VoiceOver bug fixes, but some are still present in iOS 7.1. In addition to accessibility improvements iOS 7.1 includes an important stability improvement that limits a crashing issue that was present in iOS 7. Among other improvements, Touch ID finger print scanning accuracy is also improved for iPhone 5s users.
Users can download iOS 7.1 by going to settings > general > software update.

Tuesday, October 21, 2014
Create Automatic Screen Shots of Your Tasks with Steps Recorder!

Dear readers! Couple of months ago I wrote about how to create screen shot by snipping tool. Snipping tool is an easy way to capture image or screen of any window.
If youre interested to know more about snipping tool then click here.
Snipping tool is a manual tool to capture image. But today I will discuss about Steps Recorder which is an automatic tool to capture image or screen. You can use it for different purposes. Say for example, you can use it to make tutorial of something. When are writing about how to do something then you can use this tool to record the process with your written instructions.

Steps Recorder is built in with Windows 8. But it was also available in Windows 7 named Problem Steps Recorder. Only the name of this app has been changed everything remain same.
To start and use the recorder follow the instructions below:
- Windows 8 users, Press Start and simply type Steps then choose the Steps Recorder. And windows 7 users Press Start + R > type psr > Press Enter.
- Now it is active. To start the record press Start record. (Shortcut key- Alt + A)
- Now do your normal job that will be recorded.
- Remember, when you click on something it will be recorded. And you will see a red button with every record.
- Anytime you can pause or resume the recorder.
- Once your task finished stop the recorder. (Alt+O)
- When save box appeared press the Save button. (Alt+V)
- Give a name to the file. The file will be saved with .zip extension.
- When you open the saved file, it will opened with your browser.
And while using this app, you may find many useful tricks. Dont forget to share your ideas with us. Comment below!
Stay with Marks PC Solution to get more interesting IT topics!
Monday, October 20, 2014
Using Word 2007 ribbons for tables
If you only occasionally use Word 2007 (the word processor in Microsoft Office 2007), you might find its ribbons less intuitive than were the menus in earlier versions of Word. This can be especially frustrating while creating and maintaining tables. This document can help you remember where to find, and how to use, various Word 2007 table tools, including its:
- Table icon
- Design ribbon
- Layout ribbon
- Borders and Shading window
Creating a new table- The easiest-to-find Word 2007 table tool is the Table icon that lets you create new tables. To create a new Word 2007 table, do the following:
- Click the Insert tab to display its ribbon as shown in Figure 1 below.
- Double-click the Table icon, and then click Insert Table to display its window as shown in Figure 2 below.
- Select your numbers of columns and rows, and then click OK. For example, as shown in Figure 3 below, you might choose four columns and seven rows.
 |
Figure 1 - The Insert ribbon contains this Table icon. |
 |
Figure 2 - The Insert Table window lets you choose your numbers of columns and rows. |
 |
Figure 3 - This sample new table contains four columns and seven rows. |
Accessing table ribbons - The relatively-easy-to-find Word 2007 Design and Layout table ribbons contain table tools. Placing the text-insertion point (flashing cursor) anywhere within a table displays the yellow Table Tools label and the Design and Layout tabs as shown in Figure 4 below. You can then do either of the following:
- Click the Design tab to display its ribbon as shown in Figure 5 below. The Design ribbon contains tools for formatting the overall table.
- Click the Layout tab to display its ribbon as shown in Figure 6 below. The Layout ribbon contains tools for manipulating columns, rows, and cells.
 |
Figure 4 -The yellow Table Tools label highlights the table ribbon tabs, Design and Layout. |
 |
Figure 5 - The Design table ribbon contains tools for formatting the overall table. |
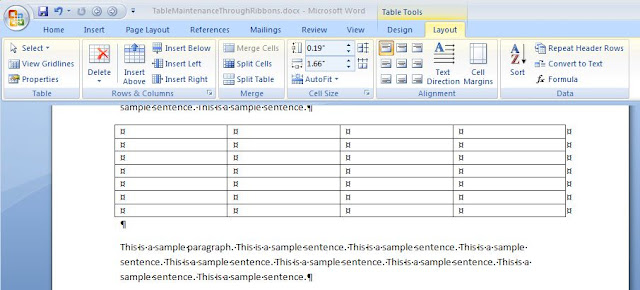 |
| Figure 6 - The Layout table ribbon contains tools for manipulating columns, rows, and cells. |
Note: For another table example table created through ribbons, please see Creating a cumulative status report through MS Word.
Applying borders and shading - The not-so-easy-to-find Word 2007 Borders and Shading window contains traditional, intuitive tools for applying borders, grids, and shading to your selected cells. To access the Borders and Shading window, do the following:
- Place the text-insertion point anywhere within the table you wish to edit.
- Click the Design tab to display its ribbon.
- At the lower-right corner of the Design ribbon, click the small arrow (at the right of Draw Borders) to display the Borders and Shading window as shown in Figure 7 below.
 |
Figure 7 - The Borders and Shading window contains traditional, intuitive tools for applying borders and shading to your selected cells. |
Sunday, October 19, 2014
Add Print as PDF Button in Your Blog!
Sometimes your blog or website reader may wanna save the post as PDF. Or they may want to print it. And there are many free tools to add Save as PDF button. But the problem is that, most of the free tools doesnt allow you to remove the background images of your site. I mean this is not print friendly. As a result whole web page is saved. And this is very irritating.
Today Im sharing a code that is free from this problem. It allows you to save only the text with related image. Lets try this-
- Sign in into your blog. Then go to design.
- From the left panel, hit on the Layout button.
- Now click on Add a Gadget.
- Choose HTML/ JavaScript.
- Now copy and paste the following code into the Content Box.
- Save the gadget and view your blog to see the change!
<script src="http://cdn.printfriendly.com/printfriendly.js" type="text/javascript"></script><script type="text/javascript">document.doAT = function(cl){var myclass = new RegExp("hentry");var myTitleContainer = new RegExp("post-title");var myPostContent = new RegExp("post-footer");var elem = this.getElementsByTagName("div");for (var i = 0; i < elem.length; i++){var classes = elem[i].className;if (myclass.test(classes)){var container = elem[i];for (var b = 0; b < container.childNodes.length; b++){var item = container.childNodes[b].className;if (myTitleContainer.test(item)){var link = container.childNodes[b].getElementsByTagName("a");if (typeof(link[0]) != "undefined"){var url = link[0].href;var index_page = true;}else{var url = document.url;var index_page = false;}if (typeof(url) == "undefined"|| url == "undefined" ){url = window.location.href;var index_page = false;}}if (myPostContent.test(item)){var footer = container.childNodes[b];}}var n = document.createElement("div");if (index_page == true) {var at = <a href= + url + ?pfstyle=wp + style="float:right; margin-right: 1em; color:#6D9F00; text-decoration:none;" class="printfriendly" title="Printer Friendly and PDF"><img style="border:none;" src="http://cdn.printfriendly.com/button-print-grnw20.png" alt="Print Friendly and PDF"/></a>;}else {var at = <a href="http://www.printfriendly.com" style="float:right; margin-right: 1em; color:#6D9F00; text-decoration:none;" class="printfriendly" onclick="window.print(); return false;" title="Printer Friendly and PDF"><img style="border:none;" src="http://cdn.printfriendly.com/button-print-grnw20.png" alt="Print Friendly and PDF"/></a>;}n.innerHTML = at;var origFooter = footer.innerHTML;footer.innerHTML = n.innerHTML + origFooter;footer.style.overflow = "hidden";}}return true;};document.doAT("hentry");</script>
If you wanna place the button at the left side then replace the red colored words as- float:left. And if you are expert in coding like html, CSS, then you can easily place this code anywhere you want.
Code for other Websites Other than Blogger:
<script src="http://cdn.printfriendly.com/printfriendly.js" type="text/javascript"></script><a href="http://www.printfriendly.com" style=" color:#6D9F00; text-decoration:none;" class="printfriendly" onclick="window.print(); return false;" title="Printer Friendly and PDF"><img style="border:none;" src="http://cdn.printfriendly.com/button-print-grnw20.png" alt="Print Friendly and PDF"/></a>

Stay with Marks PC Solution to get more interesting IT topics!
Saturday, October 18, 2014
Elago S4 Glide Review
Many people are using the iPhones and other iOS devices every day for their assistive technology needs. The iPhone is useful device that goes in and out of people pockets all day. Many children use devices to assistive them with everyday tasks. As a result of the daily use of iPhones it is important to invest in a case that will protect your device from everyday life.
The Elago S4 Glide is a hard plastic slider for the iPhone 4 and iPhone 4S. The case features a two piece design that slides over the iPhone to protect against scratches. The case comes with two bottom pieces to add variety to the cases color. The case comes in many colors and can be arranged into over 100 different color combinations. The cases allows for easy access to all ports and features. To dock the iPhone simply remove the bottom section and insert the iPhone into the dock. The back of the case shows finger prints easily and will need frequent cleaning. The case does not add much bulk to the iPhone but will not withstand drops.The case comes with a front and back screen protector as well as a cleaning cloth. The Elago S4 Glide is good for people who need scratch protection but not ideal for people who are hard on their phone or allow their young children to use their device. The Elago S4 Glide retails for $24.99 from elagostore.com. Click read more below to view pictures and videos of the Elago S4 Glide.


Case was provided complimentary to the reviewer.
Subscribe to:
Posts (Atom)