Saturday, November 1, 2014
Facebook The Social Cigarette!

Facebook - The most popular site of the world with more than 1 billion users. If Facebook were a country it could be in the third place- Just next to the China and India! And within next few years hopefully Facebook will exceed the population of China. Currently Facebook is the strongest online media.
Why people use Facebook? Why they waste or pass their idle time or even working time on it? Why they cant go a single day without it?
The answer is Addiction!
As the chain smoker smokes cigarettes one by one just for bad habits, many Facebookers waste their time on Facebook without any break. You may browse Facebook at most 2/3 hours a day. But spending more than 6 hours on Facebook is not a good sign at all.
Im not a serious critic of Facebook or Facebookers. Im just anxious about the future of the earth. Few factors are responsible to create imbalance. And Facebook is one of them. By the name of social networking site, Facebook is leading to social imbalance! Should I explain? Lets start -
- Leading to Wars: Within less than a decade of launch, Facebook has already led to several national wars. The wars occured in Lebanon, Libya, Egypt are all accelerated by the Facebook communities in those countries. When the Governments of those countries tried to stop the opponent parties, Facebook communities went against Governments.
- Spreading Aggression: A very common news throughout the world. But this is Facebook which is spreading racial, cultural and religious aggression among different communities. Sometimes a person of different values attack others directly through Facebook comments and posts. And this is the starting of endless aggression!
- Slow Down Productivity: Facebook is banned in many offices and educational institutes. Survey reports show that, many people waste half of their working time on Facebook! As it can also be visited from Mobile devices, people keep it open all the time.
- Hackers Target: Your Facebook ID is the hackers target! Because it is easy to hack. Though Facebook authority has already increased security, but hackers are smarter. They can easily beat you as well as Facebook. Anytime you can lose your account. You may be able to recover it. But within short time, they can steal your sensitive information.
- Privacy: A very very serious issue of todays world. Youre an smart user of Facebook. You use secured connection of Facebook, sign out of Facebook every time, use secured password etc etc. But when one of your FB friends lose his account then what? Your chat records as well as sharing are there! Then how can you ensure your privacy?
- Detrimental to Health: Excessive use of something is always bad. Same rules apply to Facebook. When youre using Facebook, you cant do other tasks. Maybe you use Facebook sitting on a chair. And certainly this will have a negative impact on your physical fitness. Know more . . .
- Mental Instability: Facebook is great for creating new friends. It can also help you to find your old friends. But it creates distance among existing friends! Boys and girls often fall in love through Facebook within moments! And some of them break up within few days. Sometimes your status, likes and comments may lead to serious conflicts among your friends. Divorce, Suicide, Attempt to Murder are very common incidents.
- Family Crisis: This problem usually belongs to so called modern families or modern countries of the world. When all the members of a family use Facebook then it is very easy to arise family crisis. Suppose a husband may communicate with his ex wife. Or a wife may communicate with his ex husband. And a husband may not accept his wifes friend request due to privacy problem. Even the crisis may grow between the children and parents. Parents may send friend request to the children. But they may not accept their requests. Few days ago, an Indian husband forget to change his marital status on Facebook. Consequently his wife divorced him!
- Fraud and Cheating: This is a very common problem of Facebook. Millions of people are being deceived by Fake IDs every day. Some of them are losing money. Some of them are losing privacy. Even some people are losing their IDs by sharing passwords with wrong people!
- Unnecessary/ Irrelevant Ads: For their own betterment, Facebook show ads on peoples pages. Sometimes irrelevant and stupid advertisements are being shown on profile. Which may look odd. Sometimes you will see the ads of different products and manufacturers ads. Sometimes Facebook forces users to like pages, join groups, share posts which are very irritating.
- Millions of Traps: Millions of traps are always trying to hunt you. Anytime you can caught by those traps. Suppose you get a link from your friend which says- See who have unfriend you, or See who have watched your profile. Never click on such links. Remove them as spam. If you even click on these links, it will be automatically shared with your friends and groups.
- Spam/ Virus/ Malware: This is a very common suffering for the web users. But Facebook is the land of cultivating virus, spam and malware. Spam or virus may take the form of a link or even could be normal image. Whenever you click on it, youre . . .
- Criminals Weapon: Facebook is becoming a popular medium for blackmailing and threatening day by day. A criminal can easily go to a Cybercafe with his fake ID. And he can easily threats a person. For example, he may get your sensitive information. It could be a video, audio, image or text which belong to you. And which are capable of damaging your honor. He may demand monetary or other benefits from you instead of sharing these on Facebook. Even after you fulfill his requirements, he may share those things on Facebook.
There are only few problems discussed here. Millions of problems are being generated by Facebook everyday. Dont know how to get rid of these. A shortcut way to avoid problems is to use Facebook only when it is necessary.
Stay with Marks PC Solution to get more interesting IT topics!
Friday, October 31, 2014
Google Authorship Show Yourself in the Search Result !!

If you search Google very often you may notice some search results appear with an image of a person. Basically it is the thumbnail image of the writer of that content. What do you think of it? How does it appear in the Google search result? Other search engines still dont have this feature. Then how/ why it appears in Google search result?

Look at the above image. Search item is- marks pc. And the result is Marks PC Solution. You should notice my picture with the site. You can also enable your picture when your site appears in the search result.
Actually this is a great feature launched by Google. Google named this feature as Google Authorship Program. If you wanna enable this feature for your site then you have to go through few steps which are not very critical at all. I decided to write about it more than a year ago. But failed to publish about it due to the heavy work pressure.
But believe me, for my site, Marks PC Solution, I didnt enable this feature knowingly! Then how does my image appear in the search results? The answer is my Google Plus Profile. Yes, this feature works for that sites which writers have Google Plus Profile.
If you already see your image in the search result with your sites link, then you dont need to do anything more. That means the URL of your Website/ Blog is already linked to your profile. Thus this features is already enabled for you.
About Google Authorship Program
Google authorship program was launched on June 28, 2011. In that time, only a few hundred authors joined this program. Because many people were not familiar with this feature. But day by day, authors are being interested to enable this feature for their sites and contents.
Many of you may think Google considers authorship as a search ranking factor. But to be honest, still it not being used by Google as a search signal. Google uses more than 200 signals to determine search ranking. And in the future authorship program may be used as a search ranking factors.
How to Enable this Feature?
Well this is very easy. All you need is just a Google + Profile with a link of your site in that profile. Also make sure the following issues:
- Make sure you have a high quality Google+ profile picture with a recognizable headshot. I mean your face should be identifiable on that picture.
- Make sure a byline containing your name appears on each page of your site. Have a look at the end of this post- Posted by Abdur Rahaman.
- Make sure byline name and your Google+ profile name are exactly same.
- Make sure that your Google+ email address and your sites email address are same. If your sites email address is different then read more.

If youre sure about the above issues then just do the following:
- Go to your Google+ Profile.
- Then move to the About tab of the profile.
- Now scroll down to the Links section. Look at the above image.
- There are three options available: Other Profiles, Contributor to and Links.
- Hit on the Edit option. See the image below.
- Add your sites name and URL here. See the image below.
- Also add your sites name and URL in the Links too.
- Now save it and wait for your picture to be appeared in the search result. It may take few hours to few days depending on how much time is required by Google to crawl your image.

Finally, though Google doesnt consider authorship program as a search ranking signal, still it might be an important factor in SEO. You can consider this exactly as search description. Often people choose a site from search result by reading the search description of that page. And if the image of an author is familiar to the visitors and if that author is popular among them, then it will be very helpful for the visitors to pick the site from the search results!
So what do you think? Isnt it also important to increase your sites visitors? Enable it now to get advantage!!!
Stay with Marks PC Solution to get more interesting IT topics!
Thursday, October 30, 2014
How to Change the Drive Letters

Few days ago my PC got some problems. And I need to reinstall my Windows 8. After installing a fresh Windows, I got surprised! Drive D was missing from my drive list!
What happened actually? D drive was automatically named as E. And all the drives names were replaced by the next letter. Such as E with F, F with G and G with H. Though I dont the actual reason maybe it is caused by the new Windows, but I can show you how to get rid of this change.
If you face the same problem, or just want to change the name of your drives, you can follow my instruction.
- Right click on My Computer icon from desktop and select Manage.
- Now hit on the Disk Management from the left panel.
- Here you will get the list of your drives.
- Then right click on any drive that you wanna change, and hit on Change Drive Letter and Paths.
- Now Click on the Change and Select another letter for this drive from drop down list.
- Finally hit on the OK button for twice. Open your Explorer to see the change.
Stay with Marks PC Solution to get more interesting IT topics!
Wednesday, October 29, 2014
Ginger Corrects Spelling and Grammar Mistakes
Ginger is an automatic spelling and grammar tool that corrects mistakes at the touch of a button. Ginger also has other features that Microsoft Word spell check does not. People who have dyslexia, are learning English or need documents with correct spelling and grammar can benefit from Ginger. Ginger corrects mistakes that spell check does not such as homophones. Ginger also makes context based corrections. For example if you write "Their is a big house" Ginger would corrected the sentence to "there is a big house." When editing a document press F2 to get corrections from Ginger. Ginger includes a text-to-speech option that speaks the input and output text aloud. The text-to-speech function can also read documents, web page and emails aloud. For users that wish to improve their grammar and spelling, Ginger offers informative lessons and quizzes. In order to use all of the features of Ginger you must have an Internet connection. The cost rages from $4.90 a month to $89 for a one time payment depending on the features you want. The premium version cost $89 and comes with text-to-speech, lessons to learn from your mistakes and spelling and grammar check. For $29 you get contextual grammar and spelling check. For a monthly payment of $4.90 you also get contextual grammar and spelling check. Ginger is only available for PCs. To test out Ginger type a sentence into the graphic above and press "Ginger It." Visit gingersoftware.com for more information.
Tuesday, October 28, 2014
Bypassing animated Google doodles
Google often replaces its browser logo with a graphical variation, which it calls a Google doodle. Occasionally, Google animates a doodle. If you use a Chrome or Chromium browser, or a Chromebook, you probably enjoy most Google-browser startup doodles. However, you might not appreciate Googles animated startup doodles because you find them distracting.
This document explains how to bypass animated Google doodles easily in either Chrome or Chromebook.
Bypassing animated doodles in Chrome
If you use either a Chrome or Chromium browser, you can bypass animated Google startup doodles as follows:
Bypassing animated doodles in Chromebook
If you use a Chromebook, you can bypass animated Google startup doodles as follows:
Read more »
This document explains how to bypass animated Google doodles easily in either Chrome or Chromebook.
Bypassing animated doodles in Chrome
If you use either a Chrome or Chromium browser, you can bypass animated Google startup doodles as follows:
- As shown in Figure 1, click the Customize button (three horizontal bars) to display its menu.
- Click Settings to display its page.
- In the On startup section, select Open the New Tab page as shown in Figure 2.
- Close the Settings page.
 |
| Figure 1 - Clicking the Customize button. |
 |
| Figure 2 - Setting each Google-browser startup as a new tab page. |
Bypassing animated doodles in Chromebook
If you use a Chromebook, you can bypass animated Google startup doodles as follows:
- As shown in Figure 1, click the Customize button (three horizontal bars) to display its menu.
- Click Settings to display its page.
- Scroll to the bottom of the page, and then click Show Advanced Settings.
- Scroll to the On startup section, and then select Open the New Tab page. as shown in Figure 2.
- Close the Settings page.
Monday, October 27, 2014
Google What is 1 button

 When you browse net and read various articles then you might see the Tweet, Facebook like, Stumble Upon button after the post. But at present time you may see another button with other sharing buttons. This is +1 button.
 The +1 button is nothing but an alternative to Facebook like button. But dont think it just like Facebook like button. It is something more than Facebook like button.
When you +1 something actually youre doing many things. Give a +1 to a post means youre recommending this post on Google Search, Sharing with your friends in your Google + Circle and most importantly youre saving the page in your +1 list.
In order to use the Google +1 button, you must have a Google Account. And the account should be visible to public. If you dont set your profile publicly visible then you will not be able to see and use +1 button.
Sometimes you may wanna save a copy of your favourite web page. But you dont need to do so if you use +1. If you see a +1 button in that web page then just give a +1 and you will find this page in your Google + profile at the +1 list!
Sunday, October 26, 2014
How to Solve an Error “Cannot open Documents The” of MS word
-->
When MS word gets corrupt, it givesseveral types of error while opening it. Error message is depend oncause of corruption. You will receive different type of error messagein different scenario. Here I am providing solution for “Cannotopen "DocumentsThe” error message which you will get,when you try to open MS word file. Along with this error message youmay get few massages which are written below...
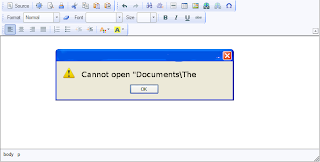
“Cannot open C:My”
“Cannot open "Test.doc"”
Main Cause of the problem: MS wordcorruption is not basic cause of this type of error. The main causeof this problem is registration of your MS word version is get expireand you need to re-register to fix this problem. The process ofre-registering is very easy and you can perform it very easily.
You can use bellow written method on MSword 97 and above version
- Boot your system.
- Click on Start --> Run
- When run box open type winword /r command and hit Enter.
Note: Dont forget to place space before forward slash.
After re-registering process is overthen double click on MS word file. You will able to open MS word file without any error. In case problem still persist then it signify that your word file is severely corrupted and in that case you need to some advance MS word repair software.
Saturday, October 25, 2014
How to Put WordPress Site Offline

WordPress Visibility option allows you to control who can visit your site, whether search engines will index it or not etc. In my last post, I discussed how to put blogger site offline. And in this post Im gonna talk about WordPress.
In my previous post, I discussed the reasons behind putting a site offline. Here I would like to repeat those reasons -


In my previous post, I discussed the reasons behind putting a site offline. Here I would like to repeat those reasons -
- If your site is new, you can discourage search engines to index your site. Because a new site with insufficient content will not get a good rank.
- If your site is private or subject to premium membership, you can disallow general people to view your contents.
- Due to political violations or religious issues, if your social security is under threat, you can temporarily make your site unavailable instead of deleting it.
Site Visibility Options
- Login to your WordPress site and go to Admin Panel. (ie. https://munnamark.wordpress.com/wp-admin)
- Go to Settings from the left pane and choose Reading. (As shown in the above image) (ie.https://munnamark.wordpress.com/wp-admin/options-reading.php)
- Now you will get the Reading Settings page.
- Move to the Site Visibility section. There you will get three choices.
- The first choice is the default option. It allows search engines to index your site.
- The second choice forbid search engines to index your site.
- And the third option makes your site private. That means only invited persons will be able to access your site.
- Choose any of the three options that is suitable for you.
Note: You can change the settings at any time.
Adding Users in a Private Site
If you make your site private, then you have to manually invite members to your site. Only invited members is capable of viewing your contents or writing posts in your site. To invite users, follow the steps below:
- Go to your WordPress control Panel
- Choose Users > Invite New (As shown in the above image) (ie. yoursite/wp-admin/users.php?page=wpcom-invite-users)
- Now you will get the invite users form. Type username or their emails. Choose one of the five roles (Contributor/ Author/ Editor/ Administrator/ Follower) for the invited members.
- Type an invitation message if necessary
- Finally hit on the Send Invitation button.
Then the invited user will get an email. If he accepts the invitation, you can view the member in the past invitation section. From there you can manage your members.
Hope youve clearly understand the topic. If you have any confusion, dont hesitate to leave a comment. :)
Get more tips on Blogging . . .
Stay with Marks PC Solution to get more interesting IT topics!
Friday, October 24, 2014
Type Bengali with Avro Keyboard
In Bangladesh the most used software for Bangla typing is Bijoy. But this is not a free software. So most of the users use the pirated version of Bijoy and certainly this is against law. And Bijoy 2003 doesnt work with the Windows Vista, 7 or 8.
But there is a alternative software. And day by day it is being popular for Bangla typing. Ya, I am talking about Avro Keyboard.

- Freeware (Open Source)
- Small in size (10/11 MB)
- Only F12 can be used to switc between Bangla & English
- Unicode Fonts
- Different keyboard layouts
- Useful to write in the web
- Phonetic keyboard (English to Bangla)
- Bangla Spell Checker
- Fast and reliable
- Portable Version is also available
Download Link: http://www.omicronlab.com/
Download Customized Version (Portable)
Thursday, October 23, 2014
Printer Pro For Allows You To Print From Your iOS Device

 Printer Pro for iPhone, iPod Touch and iPad allows you to print to most printers from your iOS devices. Click here for the iPad app and here for the iPhone and iPod Touch app. Printer Pro is not a universal app so you will need to buy the app separately for your iPhone and iPad in order to have the best experience. Printer Pro allows you to print to most Wi-Fi printer and any printer attached to your computer by downloading a desktop app. To test to make sure your printer is compatible you can download Printer Pro Lite by clicking here. Setting up is relatively quick and easy. Once you set up your printer the app will remember your printer and you will not need to set it up each time. Printer Pro allows you to print email attachments, files from Dropbox, Web pages, Photos and Contacts. Click read more below to see screen shots of Printer Pro.


This app was provided complimentary to the reviewer.
Wednesday, October 22, 2014
Apple Releases iOS 7 1 with Numerous Accessibility Tweaks
Today, Apple released iOS 7.1 with numerous accessibility improvements. While these features are not as exciting as the accessibility features added in major releases of iOS they still offer advantages for many users. Most of the improvements focus on making the new iOS interface easier to see for people with visual impairments. Turning on bold text now makes the keyboard, calculator, and in app icons bold in addition to text. A new option found under the accessibility menu allows users to turn on button shapes which makes it easier to distinguish text from buttons. In addition to limiting the parallax effect, reduce motion now limits multitasking animations and animations in the weather and messages apps. iOS 7.1 also allows users to darken colors used in apps to make them easier to view and increase the white point of the display to cut down on glare.
.PNG "button shapes") |
| Button Shapes |
iOS 7.1 also includes a number of VoiceOver bug fixes, but some are still present in iOS 7.1. In addition to accessibility improvements iOS 7.1 includes an important stability improvement that limits a crashing issue that was present in iOS 7. Among other improvements, Touch ID finger print scanning accuracy is also improved for iPhone 5s users.
Users can download iOS 7.1 by going to settings > general > software update.
Tuesday, October 21, 2014
Create Automatic Screen Shots of Your Tasks with Steps Recorder!

Dear readers! Couple of months ago I wrote about how to create screen shot by snipping tool. Snipping tool is an easy way to capture image or screen of any window.
If youre interested to know more about snipping tool then click here.
Snipping tool is a manual tool to capture image. But today I will discuss about Steps Recorder which is an automatic tool to capture image or screen. You can use it for different purposes. Say for example, you can use it to make tutorial of something. When are writing about how to do something then you can use this tool to record the process with your written instructions.

Steps Recorder is built in with Windows 8. But it was also available in Windows 7 named Problem Steps Recorder. Only the name of this app has been changed everything remain same.
To start and use the recorder follow the instructions below:
- Windows 8 users, Press Start and simply type Steps then choose the Steps Recorder. And windows 7 users Press Start + R > type psr > Press Enter.
- Now it is active. To start the record press Start record. (Shortcut key- Alt + A)
- Now do your normal job that will be recorded.
- Remember, when you click on something it will be recorded. And you will see a red button with every record.
- Anytime you can pause or resume the recorder.
- Once your task finished stop the recorder. (Alt+O)
- When save box appeared press the Save button. (Alt+V)
- Give a name to the file. The file will be saved with .zip extension.
- When you open the saved file, it will opened with your browser.
And while using this app, you may find many useful tricks. Dont forget to share your ideas with us. Comment below!
Stay with Marks PC Solution to get more interesting IT topics!
Monday, October 20, 2014
Using Word 2007 ribbons for tables
If you only occasionally use Word 2007 (the word processor in Microsoft Office 2007), you might find its ribbons less intuitive than were the menus in earlier versions of Word. This can be especially frustrating while creating and maintaining tables. This document can help you remember where to find, and how to use, various Word 2007 table tools, including its:
- Table icon
- Design ribbon
- Layout ribbon
- Borders and Shading window
Creating a new table- The easiest-to-find Word 2007 table tool is the Table icon that lets you create new tables. To create a new Word 2007 table, do the following:
- Click the Insert tab to display its ribbon as shown in Figure 1 below.
- Double-click the Table icon, and then click Insert Table to display its window as shown in Figure 2 below.
- Select your numbers of columns and rows, and then click OK. For example, as shown in Figure 3 below, you might choose four columns and seven rows.
 |
Figure 1 - The Insert ribbon contains this Table icon. |
 |
Figure 2 - The Insert Table window lets you choose your numbers of columns and rows. |
 |
Figure 3 - This sample new table contains four columns and seven rows. |
Accessing table ribbons - The relatively-easy-to-find Word 2007 Design and Layout table ribbons contain table tools. Placing the text-insertion point (flashing cursor) anywhere within a table displays the yellow Table Tools label and the Design and Layout tabs as shown in Figure 4 below. You can then do either of the following:
- Click the Design tab to display its ribbon as shown in Figure 5 below. The Design ribbon contains tools for formatting the overall table.
- Click the Layout tab to display its ribbon as shown in Figure 6 below. The Layout ribbon contains tools for manipulating columns, rows, and cells.
 |
Figure 4 -The yellow Table Tools label highlights the table ribbon tabs, Design and Layout. |
 |
Figure 5 - The Design table ribbon contains tools for formatting the overall table. |
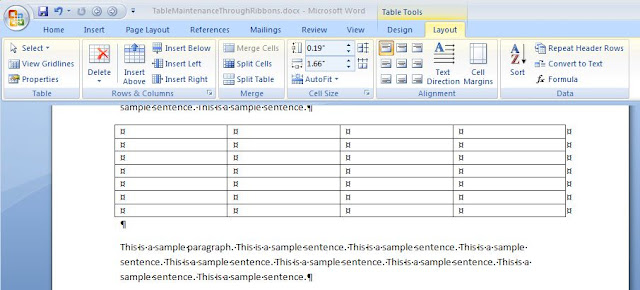 |
| Figure 6 - The Layout table ribbon contains tools for manipulating columns, rows, and cells. |
Note: For another table example table created through ribbons, please see Creating a cumulative status report through MS Word.
Applying borders and shading - The not-so-easy-to-find Word 2007 Borders and Shading window contains traditional, intuitive tools for applying borders, grids, and shading to your selected cells. To access the Borders and Shading window, do the following:
- Place the text-insertion point anywhere within the table you wish to edit.
- Click the Design tab to display its ribbon.
- At the lower-right corner of the Design ribbon, click the small arrow (at the right of Draw Borders) to display the Borders and Shading window as shown in Figure 7 below.
 |
Figure 7 - The Borders and Shading window contains traditional, intuitive tools for applying borders and shading to your selected cells. |
Subscribe to:
Comments (Atom)