Tuesday, September 30, 2014
Microsoft is Gonna Acquire NOKIA !!!

Only a few years ago, NOKIA was the number one cell phone manufacturer. But current situation is really frustrating. Due to the growing competition in the market, lack of innovation, changing nature of the people, Nokias Market Share is now at the bottom. In this situation, Microsoft has agreed to purchase the business of Nokia.
The boards of directors of Nokia and Microsoft have decided to enter into a transaction. Microsoft will purchase all of Nokias Devices & Services business, patents, license and mapping services.
Nokia will get € 3.79 billion (Equivalent to $ 4.98 billion) for its Devices & Services business. And € 1.65 billion (Equivalent to $ 2.17 billion) will be paid by Microsoft to license Nokias patents. That means, Microsoft is to pay € 5.44 billion ($ 7.14 billion) in cash to buy Nokia. Microsoft will draw upon its overseas cash resources to fund the transaction. The transaction will be made in the first quarter of 2014 and subject to shareholders and regulators approval.
Stephen Elop, the CEO of Nokia, is expected to join Microsoft with Jo Harlow, Juha Putkiranta, Timo Toikkanen and Chris Weber at the closing of the transaction. At closing, 32,000 people are expected to be transferred to Microsoft, including 4,700 in Finland and 18,300 employees directly involved in manufacturing, assembly and packaging worldwide.
Win-Win Situation for All
This transaction will generate a win-win situation for employees, shareholders and consumers of both companies.
Nokias Benefit
Nokia has a very little chance to recover its reputation and position in the market. Its almost out of competition. Innovative devices from Samsung and Apple will hardly allow Nokias products to compete in the market. But Lumia, operated by Windows 8 OS, has a chance to compete with Apple and Samsung Devices. When Microsoft will acquire all of Nokias Smart Phones including Lumia, definitely the devices will be much improved. Thus it could be a good come back for Nokia.
Microsofts Benefit
Two decades ago, Apple was beaten by Microsoft in Personal Computer Business. Due to the huge popularity of Windows, Apple Computers were not preferred by the users. But the scenario has changed with the passage of time.
Now people like mobile devices like cell phones and tablets. Most of the PC users are no longer interested to purchase desktop PCs. They are switching to Samsungs Galaxy Tabs and Apples i Pads Consequently the sale of Windows OS falls dramatically. Microsofts new OS, Windows 8, was not sold as expected.
To retain market share, Microsoft should focus on mobile devices. Following this theory, Microsoft has introduced its first tablet device - Surface. Earlier, Microsoft also produces Windows phones but they were not successful.

When Microsoft failed with Mobile Devices again and again, it decides to purchase Nokia.
Good News for the Fans
This is a good news for the fans of both companies. Because Nokia lovers will get more innovative products. And Microsoft users will get better mobile devices. And I personally believe, Microsoft and Nokia together, will produce good devices and provide better services to the valued customers.
This transaction is considered as a business strategy for both companies. Both companies have a chance to come back in the market. As the PC market is down, Microsoft must grab the tablet market. And due to the huge competition and changing tastes of the people, Nokia must go for the innovation. So, there is no alternative to change. This acquisition is the demand of time.
What next? Wait and see - what the two do next . . .
Stay with Marks PC Solution to get more interesting IT topics!
Delete All Emails from Yahoo Inbox!!

By the grace of Facebook, your inbox is getting fat everyday. If your Yahoo Inbox are filled with thousand of unnecessary messages, then it could be difficult for you to find the important mails. Gmail users can easily delete all emails from inbox because it has option to select all messages at the same time.
Like Gmail, Yahoo has also the Select All option. But the Select All option of Yahoo cant select the whole inbox. It is capable of selecting the loaded messages only. It could be 50, 100, 200 or how much messages youve loaded at a time. If you wanna delete a large volume of messages from Yahoo inbox, then you have to be little bit tricky!
Today, Im gonna discuss how to quickly delete all messages from Yahoo Mail inbox.
Before you start -
Make sure youre using the latest version of your browser and latest interface of Yahoo Mail. Firefox or Internet Explorer is optimized for Yahoo Mail. Chrome users could get a message to change the browser. And definitely you need a better net connection while running this task.
Deleting All Messages of Yahoo Inbox
- Sign in to Yahoo and open your Yahoo Mail Inbox. Never press Esc. Let the mailbox load completely.
- By default, 50 messages will be loaded at a time.
- If you scroll down, another 50 messages will be loaded. Thus continue scrolling to the bottom.
- If you get bored then delete the already loaded messages. Hit on the Select All button and press the Delete key.

- After pressing the Delete button, you will get the following notificaiton.

- Hit OK to delete all the selected messages.
If you just continue scrolling down for 2/3 minutes, I believe you will be able to delete more than 5000 emails at the same time.
Thus if your inbox has more than 10000 emails, I dont think you need more than 7/8 minutes to delete them. :)
Now look at my inbox below -

My inbox is blank. And there are more than 2000 mails in my Trash box. And it took a very short time to delete all messages from the Yahoo inbox by using the above method!
Stay with Marks PC Solution to get more interesting IT topics!
Is your PowerPoint file really got corrupted
Have you ever suffer with any PowerPoint file corruption error message. If yes then first answer these questions to ensure that your file is really corrupted:
Is your file password-protected?
If you are trying to open your password-protected file in previous version of PowerPoint then in this case you may also receive PowerPoint file corruption error message.
Did you receive this file by e-mail attachment?
If you receive file by email attachment & give an error message while you trying to open it then you should again try to download it & again try to open it. If you still get corruption error message then ask the sender to send it again.
Are you trying to open PowerPoint file created in a previous version?
If you are trying to open your file in previous version of PowerPoint then you may also receive file corruption error message. In this case you should Check for Updates option from the Help menu then install the Critical Update.
If all above conditions are not true then your file is really get corrupted.
Use following methods to resolve PowerPoint File Corruption.:
1. Use Slides from Files on the Insert menu:
- Open a new blank presentation.
- On the Insert menu, click Slides from Files.
- In the Slide Finder dialog box, browse to your corrupt file.
- Click Insert All.
If the corrupted slides successfully add then you can apply your older slides format to correct the formatting.
2. Open the presentation in Microsoft Office Word.
- Open Word.
- On the File menu, click Open.
- In the Open dialog box, click the arrow next to the Files of Type box at the bottom of that dialog box, and then click Recover Text From Any File.
- Navigate to your corrupt file, select it, and then click Open.
Use next step if this step get failed to repair corrupt PowerPoint files.
3. Move the file to a different place.
Try to copy the file to a different place like different computer’s hard drive, different drive on your computer and then try to open it again.
Use next step if this step get failed to repair corrupt PowerPoint files.
4. Try Third Party PowerPoint Recovery Tools
Sometimes above steps does not repair everything in your presentation. In this case you should consider a third-party PowerPoint recovery tool. These tools are specially design to repair corrupt PowerPoint presentations.
Conclusion: To get rid of all above steps, you should daily update your backup as it is the best way to prevent file corruption.
The Touch ID Fingerprint Sensor on the New iPhone 5s Has Major Accessibility Implications

Today Apple announced the iPhone 5s with a fingerprint sensor dubbed Touch ID. Touch ID allows users to unlock their iPhone and purchase iTunes content using just their fingerprint. The Touch ID sensor is located under the home button. This feature allows all users to secure their iPhone without typing in a passcode each and every time. This will encourage more users to secure their phone and decrease frustration when they enter the passcode incorrectly.
While the new Touch ID sensor is not exclusively an accessibility feature it will have large implications for some disabled users. Blind and visually impaired users will be one group to benefit greatly. These users use the built in VoiceOver screen reader to navigate the iPhone. Without being able to see the screen typing in even a simple four digit passcode with VoiceOver may be time consuming compared to a sighted user typing in the same passcode. (Dont take this the wrong way, VoiceOver is a fantastic feature that gives blind and visually impaired users access to their devices. It just takes longer to enter information). With the new Touch ID sensor VoiceOver users will be able to almost instantly unlock their iPhone just as quickly as any other sighted user.
The Touch ID sensor will also benefit people with cognitive disabilities who are unable to remember a passcode, but still need to protect their device. People with cognitive disabilities can benefit greatly from various iPhone apps, but may not be able to remember a passcode to protect their device. Now with the Touch ID sensor cognitively impaired users can easily unlock their iPhone with their finger. It eliminates the fear and possibility of forgetting your passcode.
The iPhone 5s will also include iOS 7 which includes new accessibility features. Click here to learn more about iOS 7 accessibility. Click read more below to view videos about the iPhone 5s.
Marks PC Got a New CPU!

Finally Ive got a new system unit! I purchased the CPU in April 02, 2014. I was very busy with transferring my files from old PC. So I didnt get enough time to write about my new CPU. In this post Im gonna share my experience with you. And I also would like to give you some tips which you can follow before and after buying a new PC.
In fact, Im suffering with my old PC for more than a year. It shuts down without notice. And there is no definite pattern of shutting down. Actually the parts are 5.5 years old. So I didnt think about repairing. Ive purchased a new system unit.
I would like to start with my CPU configuration:
In fact, Im suffering with my old PC for more than a year. It shuts down without notice. And there is no definite pattern of shutting down. Actually the parts are 5.5 years old. So I didnt think about repairing. Ive purchased a new system unit.
I would like to start with my CPU configuration:
- Processor: Intel Core i3-3220, 3.3 GHz (4 CPUs), 3MB Cache
- System/Mainboard: GIGABYTE H61M-S2PV, LGA 1155 (Ultra Durable)
- Memory: Team Elite 4GB DDR3 RAM with 1600 Bus Speed
- Hard Drive: Samsung 1 TB HD 103SM
- DVD Drive: HP DVD Writer 1265
- Casing: San ATX Casing (E011B) with High Watt Power Supply
After assembling the CPU, the seller asked me to power on the system. I pushed the power button but it didnt run! Then he checked the connectors, power cords and everything. My father was there. He advised to check the power switch.
Then the seller used reset switch to turn on the system. And it worked! What happened actually? There was a fault in the power button. After changing the internal connector of the power button, it worked fine.
Total Cost is approximately $ 340. 3-year warranty for Mainboard and CPU. Product lifetime warranty for RAM. Hard Disk and DVD writer get 1 year warranty.
Here is my system rating:

Here is my system rating:
Now Id like to discuss what to do before and after buying a new PC.
Before you Purchase - Think
- What do you do using PC?
- How much heavier your tasks are? Gaming, Graphics or Official Tasks?
- How much you know about configuration? Are you an expert or novice?
- Do you have a familiar PC shop which you can trust? How much expert they are?
Before buying a PC, you must think about these questions. You should also think about warranty. Because computer equipments could be damaged any time. Even best quality product cant guarantee that it wouldnt be damaged. But a good brand can ensure warranty service.
You must think about your activities before purchasing a PC. What type of PC you should buy depends on your tasks. Heavier tasks like graphics, gaming requires a heavier system. But if you only browse Internet and work with Microsoft Office, then dual core PC with 2 GB RAM is enough for you.
If youre expert about PC, then its okay. But if youre just a beginner or dont have much idea about configuration, then you should talk to an expert. Or at least you can talk to a friend who has a good idea.
Finally, choose a better outlet from where you will buy the computer. Never choose a shop which offers low price PC. I swear, you have to suffer with defective parts. Just tell the seller one thing - I need a quality CPU. Price doesnt matter. Because some sellers cut the price to match your budget. And often they give you poor quality parts to reduce the price.
You must also ensure that you will get warranty for important equipments like Motherboard, Processor, RAM, Hard Disk etc.
When you Purchase - Observe
When youre at the purchase point, you should observe the assembling procedure. Make sure that, the person assembling your CPU is an expert. Otherwise equipments could be damaged due to the wrong handling.
- Be sure that every equipment is new. Check the packet before opening an equipment. Make sure that the product is properly sealed in the packet with sticker. If the seal is broken, inform the seller and ask him to give you a new one.
- Check the installation of processor. Make sure that, CPU fan is properly installed.
- There are usually 06 points in a motherboard. Make sure all of them are properly inserted into the casing.
- Be sure that internal connectors are properly connected.
- Check the USB ports with a flash drive if possible and necessary.
- Any loose connections may be the cause of danger. So be sure, there is no loose connections.
- When the assembling is complete, turn on your system properly. And make sure everything is working perfectly.
Before leaving the shop, dont forget to pack your equipments properly. Take the necessary documents - warranty papers, money receipt etc. Take the CD/ DVDs that come with the products. Ask the seller for any advice that can increase your computer life so that you shouldnt come back for warranty!
After you Purchase - Ensure Proper Maintenance
A computer could be a machine. But it needs proper maintenance just like a human body. And you must take some precautionary measures to avoid any occurrence. Here are some tips for you:
- Place the system in a cool and dry place.
- Keep the surrounding area clean to keep the dust minimum.
- Use Voltage Stabilizer and UPS to avoid any damage.
- Connect the cords using a good quality multiplug.
- Place the CPU in a way so that it doesnt touch any other object ie. walls, tables or any other electrical equipments.
- Perform maintenance tasks at a regular interval.
- Clean up your PC properly. Or take help of an expert.
Also read the following posts if necessary:
- Laptop Vs. Desktop: Which One you Should Buy?
- Maintenance Tasks: Extend your PC Life
- Clean up your PC to Avoid Overheating Problem
- Guidelines for Using PC Properly
Stay with Marks PC Solution to get more interesting IT topics!
Adding a logo to a Google Sites website
To add a logo to the header on your Google Sites website, you should create a logo as a GIF file that has a transparent background. As detailed in the procedure below, you can do this through Google Docs, the GNU Image Manipulation Program (GIMP), and Google Sites:
Read more »
- Open Google Docs, click Create new, click Drawing to display an Untitled drawing, click File, click Rename, and then type an appropriate name, such as "TClogo." Note: While using separate components (such as rectangles, circles, and triangles) to create your logo, set the boarder lines to Transparent so that your logo later displays smooth edges.
- Download your new drawing as a JPEG file, use GIMP to crop the logo, save it as a JPEG file (such as TClogo01.jpg), click Image, click Scale Image, set image height to 100 pixels, click Scale, click File, click Save, and then click Save again.

- Click File, click Save As, click Select File Type (By Extension), select PNG image, click Save, and then click Save again.

- Click Colors, click Color to Alpha, click OK, click File, and then click Save. This makes the white background of your logo transparent.

- Click File, click Save As, click Select File Type (By Extension), select GIF image, click Save, click Export, and then click Save.

- Sign into your Google Sites website, click More actions, click Manage site, click Site layout, and then click change logo.

- Select Custom Logo, click Choose File, navigate to and select your GIF logo file (such as TClogo01.gif), click Open, click OK, click Save Changes, and and then click Return to site.
Intel Reader Give Away

HOW TO DRAW A COFFEE MUG IN MS WORD
MICROSOFT WORD DRAWING PROJECT NO. 2
TITLE: A COFFEE MUG ON A COASTER
TYPE: ILLUSTRATION

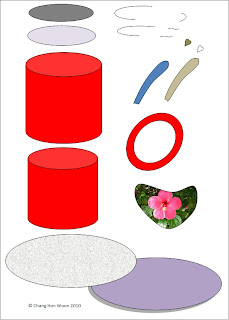
The tools needed to create the coffee mug are as follows: Can; Oval; Donut; Heart and Curve line. Draw a shape with the Curve line and then insert a picture into it by doing the following: Shape Fill > Picture > Select a picture from a folder > Insert. To create the shadow effect, click the Oval shape at the bottom and then do the following: click Shadow Effects > Drop Shadow > Shadow Style 3 and then nudge the shadow into place using the Shadow Settings. Use the Edit Points function to adjust and fine-tune the curve lines.
Using the Kurzweil Virtual Printer
Kurzweil Virtual Printer is a great tool to help read unsupported documents in Kurzweil. It works with any program that you can print from. Hope this tip helps.
Feeding Frenzy 2 Free Download !!!

Feeding Frenzy 2 is a survival game. You have to play with a fish where the larger one eats the smaller ones. You have to eat those fishes which are smaller than you. Basically there will be three stages. After finishing the first stage, you will be larger and capable of eating more fishes. Thus after clearing the three stages, you will be able to go to the next level. There are total 60 levels!
Just couple of hours ago, Ive shared another game - Egg Hunt. And Im quite happy to share two games in a row at the same day! :)
Download Feeding Frenzy 2
Download the game from the above link. Download size is 17.6 MB. Ive uploaded the game in zip format. So after downloading, youve to unzip it first. And its a portable version. Its already installed. You dont need to install it at all. :)

Instruction
Go to the game folder and double click on FeedingFrenzyTwo.exe to run the game. Now hit on the Start Game button. Choose Resume if youve any saved game earlier. Or choose New Game if you wanna create a new profile.
Remember, youve to maintain a profile. Because youve to save it. Otherwise your progress will be lost.
After starting a new game, you will ge a fish. You have to move it through mouse. Look at the top left corner. Menu will show the type of fish you can eat. And Growth will show your progress.
After eating some fishes, you will be larger in size. And then you will be able to eat larger fishes. If youre in front of a fish which is bigger than you, you will die. But you will get three chances to pass a level.
If youre able to clear a level without dying, you will get extra lives in the next levels. Thus lives will be added from one level to another.
This game is 100% mouse dependent. But it doesnt require so many clicks. There are some stages which need mouse clicks. In most levels, you just need to move your mouse.
Options
From the options, you can control sound, music, mouse speed etc.
Its a nice animated game. And I hope, all of you will like it. Dont forget to comment . . .
Stay with Marks PC Solution to get more interesting IT topics!
Trimit Summarizes Any Text into a Couple Sentences
Trimit is an iOS app that summarizes any sized article into a few sentences. The app is free for a limited time so download now. Trimit can take large articles and condense the information into smaller amounts of text. Trimit tries to convey the maximum amount of information it a short amount of text. In order to have an article summarized you type in the URL or copy and paste the text into the app.
"trimit uses a wide variety of heuristics and variables in editing the content to convey the maximum amount of information in the specified length. When summarisng, specified filters can be applied, which include as the addition of acronyms, abbreviations, URL shortening and even removal of vowels that are not integral in the word’s comprehension."Trimit allows you to choose the length of the summarized text. Your summarized documents can be 140 characters to 1000 characters in length. Once your document is summarized you can share it via social media sites. For more information about automatic summarizing tools click here and here.
Source: www.cultofmac.com
Monday, September 29, 2014
HOW TO DRAW A LIGHTED CANDLE IN MS WORD
MICROSOFT WORD DRAWING PROJECT No. 23 PART 1
TITLE: HOW TO DRAW A LIGHTED CANDLE IN MS WORD
TYPE: GRAPHIC DESIGN
This design can be used in many ways. I’m just trying to show how this illustration is created in MS Word. Sometimes when there is a blackout in my area due to power failure, I will light up some candles to lighten the place up. I like to put the candles on metal container covers and tin cans. Hence, this experience gave me the idea for this graphics project. The picture below shows a lighted candle placed in a tin can filled with sand. You can also see that the candlelight is in four subtle shades of yellow. How do you create these tonal values?
Here are some tips for readers to try drawing this at home. The tools needed to create this drawing are as follows: Oval, Can, Curve line, and Rectangle. By the way, make use of the Fill Effects and More Fill Colors options to add shading and decorative effects to the illustration.

Tools to Make Typing on iPad Easier


Typing on the iPads touch screen can be difficult and slow compared to a physical keyboard. While typing on the iPad you must look at the screen because you can not feel the keys. For people that can not see the screen typing on the iPad is slow. There are a couple of tools to solve this problem. The first solution is the iPad keyboard dock. The keyboard dock plugs into the iPads dock connector and works with the iPad and iPad 2. The keyboard is similar to desktop and laptop key boards but has function keys specialized for the iPad. The keyboard dock costs $69 from Apple. Another option is a Bluetooth keyboard which connects to the iPad wirelessly. There are many Bluetooth keyboards on the market. Bluetooth keyboards can improve your typing experience on the iPad. Yet another solution is Keyguard which is a clear piece of plastic with holes cut where the virtual keys are. Keyguard fits on the iPad so it does not slide off. Keyguard allows you to feel the location of the virtual keys. Keyguard comes it portrait and landscape views. Each orientation of Keyguard costs $19.95 from Lasered Pics. With these tools you will be able to type faster and more accurately on the iPad.
How to install virtual XP on Ubuntu
After you install virtualization software, such as VirtualBox OSE, on an Ubuntu host operating system, you can install almost any other guest operating system to run simultaneously with its Ubuntu host. A guest operating system is also called a VM (Virtual Machine). This article explains how to install VirtualBox on an Ubuntu host, and then run it to install Windows XP as a guest operating system, (also called a Windows XP client, or a virtual machine XP).

Installing VirtualBox
To install VirtualBox OSE on Ubuntu, do the following:
- Click on the Applications menu to display its drop-down list.
- Click on Add/Remove to display the "Add/Remove Applications" window.
- Select VirtualBox OSE, and then click on Apply Changes to display its dialog.
- Click on Apply to install VirtualBox OSE.
Setting Up VirtualBox
To set up VitualBox, do the following:
- Use Applications -> Accessories -> Virtual Box OSE to display the "Welcome to VirtualBox" window.
- Click on New to display the "Welcome to the New Virtual Machine Wizard."
- Click on Next to display the "VM Name and OS Type" window, type a name (such as MyVirtualXP), select the Microsoft Windows Operating System, and then select the Windows XP Version.
- Click on Next to display the "Memory" window, accept the default Base Memory Size, and then click on Next to display the "Virtual Hard Disk" window.
- Click on New to display the Welcome to the "Create New Virtual Disk Wizard," click on Next to display the "Hard Disk Storage Type" window, accept the default Storage Type, and then click on Next to display the "Virtual Disk Location and Size" window.
- Set Size to approximately 20 GB, click on Next to display the "Summary" window, and then click on Finish to display the "Virtual Hard Disk" window. Accept the default virtual boot disk.
- Click on Next to display the "Summary" window, click on Finish to display the "VirtualBox OSE" window, and then close that window.
Installing Virtual XP
To install Windows XP as a guest operating (virtual XP, virtual machine XP) system on your Ubuntu host operating system, do the following:
- Use Applications -> Accessories -> Virtual Box OSE to display the "VirtualBox OSE" window.
- Place your Windows XP installation CD into your CD drive, and then click on the Settings icon, click on CD/DVD-ROM, and then select (check mark) Mount CD/DVD Drive.
- Click OK to redisplay the "VirtualBox OSE" window.
- Click on the Start icon to display a "VirtualBox Information" window that explains the "Auto Capture" keyboard. (The host key is the right Ctrl key.) This lets you switch the keyboard (and, separately, the mouse) between Ubuntu and its virtual XP.
- Click OK to close the "VirtualBox Information" window, and then follow the prompts to install a Windows XP client (virtual XP, virtual machine XP) on your Ubuntu host.
Important: Before you can install updates to your
Windows XP client, and before it can run correctly,
you must install its Guest Additions
according to the section below.
Windows XP client, and before it can run correctly,
you must install its Guest Additions
according to the section below.
Installing Guest Additions on Virtual XP
To install Guest Additions on your Windows XP client, do the following:
- From within your Windows XP client window, press right Ctrl, select Devices, and then click Install Guest Additions to display the "VirtualBox - Question" window.
- Click Yes and then click Download to download the CD image and display the download-progress indicator in the lower left corner.
- After the CD image downloads successfully, click Mount to display the Guest Additions Setup Wizard and then click Next to display the License Agreement.
- Click I Agree to display the default Destination Folder, click Next, and then click Install to start installing Guest Additions.
- At each Microsoft warning, click Continue Anyway.
- Select Reboot now and click Finish.
How to Solve “This file is not in a recognizable format” Error of MS excel
 Image via Wikipedia
 -->
MS excel is one of the most importantspreadsheet application for computer users. Storing and managing data is very easy with Ms excel. All important data saved inside these excel sheet. Imaging the situation in which you are trying to open an important excel sheet but could not do so, it gives some error. These errors means that your spreadsheet is get corrupt and you need to repair it to repair your valuable data. Excel recovery is required to repair this damaged .xls sheet.
Microsoft offer solution for corrupt excel sheet where you have to link the corrupt spreadsheet with news one. But this solution work hardly ever. So here I am going to explain a solution to easy repair of damaged excel sheet.
Follow the steps given below to:
- Open an undamaged workbook and a new workbook.
- In the Insert menu of new workbook find hyperlink and create link with undamaged workbook. Now close undamaged workbook.
- The link in cell A1 displays the path to the non-corrupted file. Edit the formula in cell A1 by substituting the corrupted file name for the existing one.
- If it works, the corrupted file will open. In this case, copy the formula down and across until the link returns blank cells.
- Select the data, copy it, and choose Paste Special from the Edit menu. In the resulting Paste Special dialog box, click Values and click OK to paste the data over itself. Doing so removes the link formula, but the values returned by the link remain.

Brand New iPod Touch Announced

Apple released a new version of the iPod Touch. The fifth generation device includes the same large screen as the iPhone 5. In addition to large screen the new iPod Touch has a faster A5 processor, much improved 5 mega-pixel camera, iOS 6, Siri and Loop. Read on to learn what these features mean for people with special needs.
Camera- The new improved camera is good enough to use optical character recognition (OCR) apps. OCR apps allow you to take a picture of text and have it read back to you using text-to-speech. One great OCR app is Prizmo.
iOS 6- iOS 6 will improve the already great accessibility features of the previous versions. The new operating system will include features such as Guided Access and Speak Selection with synchronized highlighting. To learn more about iOS 6 click here.
Siri- Apples voice activated personal assistant will make its way to the iPod Touch. Siri can answer questions, spell words, read messages, set reminders, check the weather and more.
Loop- Loop is a very interesting new feature exclusive to the iPod Touch. Loop is a detachable wrist strap that hooks onto the back of the iPod Touch. Loop could be a great feature for you children and people with physical disabilities. Loop is seen in the above picture.
The iPod Touch will be available in the coming weeks starting at $299. Click read more below to view more photos of the new iPod Touch.


Word Paragraph Spacing
Paragraph Spacing in Microsoft Word 2007, 2010 and 2013
Run Word 2007/2010/2013, click the "Home" tab on the ribbon and navigate to the "Change Styles" item under the Styles options. And then click this item, there will pop up a drop-down menu, in which the "Paragraph Spacing" is at the bottom obviously. Point to the "Paragraph Spacing" item in the menu, and a Built-In dialog will appear, where we can edit, set and custom Paragraph Spacing on word 2010.
 |
| Word 2010 Paragraph Spacing |
How to Remove Facebook Timeline

Facebook users are often dissatisfied with it due to its controversial activities. One of them is Facebook timeline. Probably this is the most important issue at present for Facebook users.
Timeline is a new kind of profile that lets you highlight the photos, posts and life events that help you tell your story. If you activate timeline then youll have 7 days to preview whats there now. This gives you a chance to add or hide whatever you want before anyone else sees it.
If you activate timeline once then there is no official way to deactivate it! Many users find it too complex as well as boring.
If you wanna change back to the old style profile or if you havent got Timeline yet, but just wanna see your friends Timeline pages in the old style profile format, this guide is for you.
If you visit a personal Facebook Timeline with IE 7 then you will be shown old style profile page for that person. Because FB havent created any version of timeline that is compatible with IE 7.
But IE7 is no longer using by the users due to its several limitations and security issues. Now follow the steps below for your browser:

Google Chrome
To change Google Chromes User Agent you first need to download the appropriate file below, depending on what Operating System you are using. The content of the file is basically the command listed below in the pale blue box.
Chrome on Windows Vista & 7
If you are using Windows Vista or 7 the command in the file that will run Chrome with IE7 as the user agent is as follows :
"%USERPROFILE%AppDataLocalGoogleChromeApplicationchrome.exe" --user-agent="Mozilla/4.0 (compatible; MSIE 7.0; Windows NT 6.0)"
- Download (Right Click on the link, select Save link as... and save the .bat file to your Desktop)
- Then Install the F.B. Purity browser extension, as it will fix a lot of the display glitches that will occur when you have your browser set to impersonate IE7.
- Close all running Chrome browser Windows and Tabs, then click the previously downloaded .bat file and it will run Chrome with IE7 as its user agent.
- Now visit a personal Timeline page and you will see that it is now displayed as a normal, old style profile page. If at any point, you wanna go back to using the normal User Agent, just close all Chrome windows and then open Chrome using your usual Chrome Icon, instead of the Bat file.
Try the Easiest Way to Remove FB Timeline Now!!
Chrome on Windows XP
If you are using Windows XP the command in the file to start Chrome with IE7 as the UserAgent is as follows:
"%USERPROFILE%Local SettingsApplication DataGoogleChromeApplicationchrome.exe" --user-agent="Mozilla/4.0 (compatible; MSIE 7.0; Windows NT 6.0)"
- Download (Right Click on the link, select Save link as... and save the .bat file to your Desktop)
- Next Install the F.B. Purity browser extension, as it will fix a lot of the display glitches that will occur when you have your browser set to impersonate IE7.
- Close *all* open Chrome browser Windows then click the previously downloaded .bat file and it will run Chrome with the IE7 user agent.
- Now visit a personal Timeline page and you will see that it is now displayed as a normal, old style profile page. If you wanna go back to using the normal User Agent, just close all Chrome windows and then open Chrome using your usual Chrome Icon, instead of the Bat file.

Its easy to switch Firefoxs User Agent to IE7, the steps are as follows
- Install the "User Agent Switcher" Extension from addons.mozilla.org/firefox/addon/user-agent-switcher/
- Install the F.B. Purity browser extension, as it will fix most of the display glitches that occur when you switch the browsers User Agent to IE7, and it also has a lot of other cool and useful features for customising Facebook.
- Go to Firefoxs "Tools/User Agent Switcher/Internet Explorer" menu and select "Internet Explorer 7"
- Now go and view a personal Timeline page, it will be displayed in the old Profile format. BTW If you want to at any point switch the User Agent back to normal, just set the User Agent to "Default User Agent" or else just disable the "User Agent Switcher" extension.
- Now go and view a personal Timeline page, it will be displayed in the old Profile format. BTW If you want to at any point switch the User Agent back to normal, just set the User Agent to "Default User Agent" or else just disable the "User Agent Switcher" extension.

Safari on Mac & Windows
- Install the F.B. Purity browser extension, this will fix most of the display glitches that occur on Facebook when you use the IE7 User Agent, and it also has a lot of other cool and useful features for customising Facebook.
- To switch the User Agent in Safari, you need to first go into the "Preferences" menu, select "Advanced", then tick the "Show Develop menu in menu bar" option, then exit the preferences menu.
- Now click the page icon menu (next to the cog wheel icon) then select the develop/user agent menu, there you can choose the useragent you wish to use for the current website you are viewing. Select Internet Explorer 7.
- Now view any personal Facebook Timeline page and it will be displayed in the old style Profile format.
N.B. If you want to restore your User Agent to normal in Safari then just follow Steps 1 and 2 again, but this time select the "Default" user agent

Opera on Windows, Mac or Linux
- Install the FB Purity browser extension, which will fix some of the display problems that arise when you set your browser to impersonate IE7, it also gives you lots of options for hiding spam and other news stories and facebook features that you dont want to see.
- To set the custom user agent in Opera, enter "opera:config#ISP|Id" into the url/address bar, then enter the Custom User Agent string "Mozilla/4.0 (compatible; MSIE 7.0; Windows NT 6.0)" and click "Save"
- Restart your browser and view your profile page, or any other personal Timeline profile page, and it will display it in the old Profile format
N.B. If you wanna restore your User Agent to normal in Opera, just follow the first part of step 1 again, and then click the "Default" button then click "Save"
If you hate Timeline like most of the users then you may submit a complain directly to Facebook about it. To do so, go to Facebooks Official Timeline Feedback form.
Try the Easiest Way to Remove FB Timeline Now!!
How to repair or rebuild your desktop PC
Although many people consider full-size desktop PCs too old fashioned, they have one great advantage over other PCs, including laptops, netbooks, tablets, and most all-in-one desktops: You can easily repair a desktop PC, or rebuild it if necessary. If you are careful and patient, this can save you a lot of money. You are not limited to replacing only pluggable components, such as hard drives and memory modules. If necessary, you can rebuild your PC by replacing its motherboard (mainboard).

Read more »
Repairing your desktop PC - After your desktop PC fails, you need to determine which component to replace. When you try to boot your system, does it display a message? For example, if it displays "DISK BOOT FAILURE," you can almost certainly correct the problem by replacing the hard drive. However, if your system displays no message and all its indicators are dark, you might need to replace its power supply. If replacing the power supply does not repair your PC, you can try rebuilding it by replacing its motherboard (mainboard).
Rebuilding your desktop PC - To replace the motherboard of a desktop PC, you need remove most of its components, remove its defective motherboard, install a new motherboard, and then reinstall the other components, thereby rebuilding it. To rebuild your PC, do the following:
- Disonnect all power supply cables and move them out of your way.
- Remove all pluggable components from the old motherboard, such as its processor and its memory modules. Note: Avoid static-electric damage to these components. Before removing each component, be sure to first touch any bare-metal surface in the PC case. Store the components carefully (in antistatic bags if possible) because you will reinstall them later.
- Order a replacement motherboard. If you cannot find an exact match (such as identical model number) order the same type (such as micro ATX). Examine its specifications to verify it supports your existing components, including the processor (such as AMD Athlon) and RAM memory (such as DDR2).
- After your new motherboard arrives, and before you install it, verify that its front-panel sockets match the front-panel plugs in your old PC case. If not, you need also order a new PC case.
- Rebuild (reassemble) your PC.
- Install an operating system. If you install Microsoft Windows, you need to also install motherboard drivers.
- Test your PC to verify that it runs correctly.
Convert Drives to NTFS without Formatting!

Often you may need to convert your hard drives from FAT/ FAT32 to NTFS. If you have to convert all drives of your PC, then it will be really difficult for you to back up your files. Because, in order to convert drives, you have to format it. And in that case you may need to set up the whole computer. But there is an easy option for you to do this job. And you dont need to format your drive. Even you dont need to back up your files!
Okay lets start -
- Open Notepad
- Copy and paste the following code in the Notepad
title Marks PC Solution!3. Save the file as NTFS.bat
convert c: /FS:NTFS
convert d: /FS:NTFS
convert e: /FS:NTFS
convert f: /FS:NTFS
convert g: /FS:NTFS
convert i: /FS:NTFS
convert k: /FS:NTFS
msg %username% NTFS Converter: Presented by www.markspcsolution.com!
Look at the drive list. Ive used C, D, E, F, G, I, K. If your drive letters are different just make change in the drive letter. And if you need to omit something, just delete it.
Suppose, if you need to convert only C Drive then you dont need to write the following lines in notepad.
title Marks PC Solution!
convert c: /FS:NTFS
msg %username% NTFS Converter: Presented by www.markspcsolution.com!
If your desired drive letter is L, then type convert l: /FS:NTFS. By this way you can convert any other drive into NFTS.
Note: If you wanna convert from NTFS to FAT32 then you need to format it. So before converting to NTFS, make sure you really wanna do this. Otherwise you need to format the drive to back to the FAT file system.
Add a Moving Text Bar on Your Blog
Today I will give you a code that is really really useful for bloggers. You have already noticed that this post has been started with a moving text. And from this post youll learn how to add this on your blog.
Before starting I wanna say you, this bar can be used as news headline or notice bar. Or you can use this for any purpose. Its simply an html code that can be place anywhere of your blog. If you place it at the top then it can be used as news bar. You can also put it on the side or bottom of your blog. But make sure youre customizing the size and using the bar properly with the place where you wanna insert it.
Lets start. (Make sure youre using new interface of blogger)
- First, go to the design option from your blogger page.
- Then hit on Layout option from the left panel.
- Now click on Add a Gadget. I suggest to select gadget somewhere from top.
- Now scroll down and choose Html/Java Script then copy and paste the code below.
- Youre done. Save the code and refresh your blog page.
<!-- This Script is from munnamark.blogspot.com, Coded by: Md. Abdur Rahaman--> <div align="center"><font color="#ffffff" size="+1"><marquee bgcolor="#000080"direction="left"loop="20" width="100%"><strong>Visit <a href=http://www.munnamark.blogspot.com>Marks PC Solution</a> to get more interesting Computer and Internet Tips! </strong></marquee></font color="#ffffff"></div> <font face="Arial"><a target="_blank" href="http://www.munnamark.blogspot.com/"><span style="font-size: 7pt; text-decoration: none">Visit Marks PC Solution for Computer and Internet Tips</span></a></font>
- Replace the red text of the code with your text.
- Loop is 20. That means your text will be shown for 20 times. You can either increase or decrease the loop. But if you want the text to be shown for unlimited time then you should delete the this part of the code: loop="20"
- Div align center. You can use right or left.
- Font color is #ffffff. You can choose any font color by changing the value.
- Background color is "#000080". You can choose any color by changing the value.
- Direction is left. You can also use right.
- Width is 100%. You can use 40, 50 or 70% too.
Stay with Marks PC Solution to get more interesting IT topics!
Subscribe to:
Comments (Atom)